Thursday, December 13, 2012

Anthropologie Knockoff: {DIY} Rainbow Yarn Tree


 Alright.  
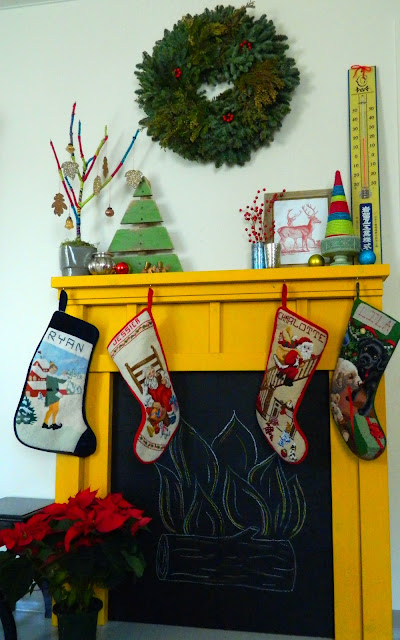
My mantel this year has been driving me CRAZY.  I'm super grateful to the Officer for building me the adorable faux fireplace, but here's the deal:  when you live in Japan there is no "I'll run up to Target to pick up somethings for my mantel". or "I'll just run up to Michael's and grab the supplies for this cute little project".  I'm not trying to complain, just stating some of the reasons I had such difficulty with my mantel!!  
Anyway, I had seen this gorgeous Rainbow Rope Tree on Anthropologie - $48. 
I already had the supplies for this one, so my cost was $0.  But even if you had to buy some yarn it's a pretty cheap project!  


I got to work trimming my shrubs and digging up some yarn from my stash.
This is the first one I made....and while it lends a funky sort of vibe...it really just looks like my 4 year old wrapped it.

SO I studied the Anthro one a little bit more and began again.


You'll need:
1 branch
hot glue/craft glue
at least 6 different colors of yarn, that you can pair in twos
I used -navy and turquoise -red and raspberry -yellow and green

Then you simply start wrapping the branches!  This is seriously addicting and probably as close to meditation as I'll ever get.  When you finish one color, simply tie a little knot - you can come back later with some hot glue and tuck them in.
Once you have wrapped all the branches, it's time to do the trunk.  I used all 6 colors - enhancing the rainbow effect.

When you get close to a branch, you can tuck all but two of the colors along the backside of the trunk and only use the two that match the branch - this makes it look more like a continuous tree.  You know, like it magically grew with pretty yarn all over it.

Lastly just put a few dabs of glue on the ends - sticking them down - it's best to have a definite front and back so that these won't show.  So there you have it!  Enjoy your beautiful, textured tree!!


Oh, you want some more pics of the mantel?  
Here ya go:


the whole shebang:
(my Grandma made those needle-point stockings!  If you notice the Officer's is Will Ferrel as Elf, designed by the Officer himself)

Seriously, this tree is so easy and SO fun.  I'm wondering what else I can start wrapping with yarn (you can see I already did a cone tree...) So leave me a comment and let me know! 
What do you think?!?
xoxo
jessica

Monday, December 10, 2012

{DIY} No-Sew "Ribbons and Bows" Holiday Shirt

So there's no better time to make holiday shirts for your kids, than the day of the party right?  Perhaps I'm the ultimate procrastinator, or perhaps I like to live life one day at a time, but I woke up this morning realizing the girls didn't have any cute party shirts to wear to Daddy's Work Christmas party....at 2:30...hmmmmm.... I always love the idea of embellishing t-shirts, but a really hate sewing anything onto jersey knit.  Even with stabilizer, I feel like it bunches up and starts to looks really funky.  BUT I didn't want to use glue either...so I fished around in my supplies and came up with some magical Stitch Witchery.  If you have any aversion to sewing, this product can be a lifesaver!  So here's my no-sew tutorial for the
Ribbons and Bows Holiday Shirt

Here's what you'll need:
Stitch Witchery
Iron
Various Ribbons
Scissorrs
A plain T-shirt or onesie (or both!)

Step 1:  Begin by tying your bows.  I used 3 on the shirt, and 2 on the onesie.  
Here's the best way to tie perfect little bows:
-Make two loops with about 2" of ribbon between them
-Cross one loop over the other
-Pull it through and tight
-Adjust the length and size of your bow

Step 2: Lay out the ribbon on your shirt.  Cut some pieces of Stitch Witchery to the length of your long ribbons. 

I then cut my S.W. (Stitch Witchery) in half, lengthwise because it was thicker than my ribbon.  You can of course buy S. W. that is the right size for your ribbon, but that would've made things way too easy ;)
Step 3:  Simply follow the directions on the S. W. box - fusing the ribbon to the shirt using the heat of the iron.  Tuck under the ends 1/4" before you press it down, so you won't have any raw edges showing. 

Then add a small piece of S.W. to at the bottom of the ribbon and cover it with a bow. 

Press again to fuse the bow to the shirt.  Continue this process until all of your ribbon is on the shirt.  Put a dab of Fraycheck or clear nail polish on the ends of your bows so they won't unravel.
(turn the shirt inside out when you wash it)
Enjoy your holiday season sporting these sweet little T's!!

Happy Crafting!!
xoxo
jessica

You may also enjoy...

Related Posts Plugin for WordPress, Blogger...