Wednesday, September 28, 2011

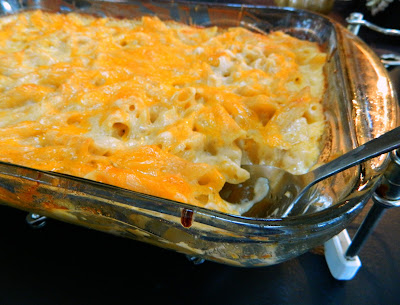
Macaroni and Cheese...my weakness

So I have a weakness for any combination of pasta and cheese.  

I hesitate to even write this post because I'm reading this book called Wheat Belly: Lose the Wheat, Lose the Weight and find Your Way Back To Health.  It's really good and I recommend it, but it is definitely NOT in favor of consuming wheat.  So let's pretend that I made this with Gluten-Free Pasta, which you could totally do and it would be just as delicious, because the secret's in the cheese.
(On a Gluten Free Pasta note you have got to try Heartland G-Free Pasta -  best I've found.  You can't even tell the difference.  I can only find it at Wal-Mart.)
This recipe isn't new - it was on Martha Stewart a few years ago, but I just rediscovered it, made it last night, and it is soooooo good.  
It's the recipe from Beecher's Cheese.  You can order the mac and cheese frozen from their website, but it costs $50...and it cost about $15 to make - still a little pricey for mac and cheese so you might want to make it a special occasion dish.
I was able to find the Beecher's Flagship Cheese (it's a cheddar) at Publix, so I bought a few ounces of that and then supplemented with Publix cheddar and Publix Jack.  Then I used Boar's Head Gruyere on top.  I served it alongside a chicken greek salad - hopefully offsetting the cheesy creaminess with some veggies and fiber :)


Oh and the Flagship sauce recipe is enough for a double batch of pasta - 12 oz.  Which of course is what I made.... and I'll also confess I ate way more than that cute little portion in that picture:)
xoxo
jessica

Tuesday, September 27, 2011

Over on Prudent Baby: Rayon Sewing 101

Hey!  Yesterday I posted some tips for sewing with rayon over on Prudent Baby. 

In case you missed it, here's the link:
Sewing with Rayon 101
They also posted some links for great tutorials that would be great using rayon. 
xoxo
jessica

Monday, September 26, 2011

Inspiration Board: Charlotte's Three Year Old Room

In one attempt to distract myself from the craziness that is my life...I've started planning Charlotte's room for our home in Japan.  I want to be able to make everything now (curtains, pillows, quilt), so that when we get there, her room can be a happy cozy place in a short amount of time.  Plus it gives me something to do now :)  So here's my inspiration.  That fabric is Valori Wells Wrenly - it's so happy and I think it will transition well from 3 - 6 yrs old which will be her ages while we are in Japan.


The plan for the bed is from here.  Ryan is going to get it all cut out, and then we'll ship it Ikea-style and assemble it when we get there.  We already have that green chair, and I think a pillow out of that bird fabric will look adorable on it.  I bought a rug at Old Time Pottery for $50 that looks very similar to the one shown here.  It's very cheery and I like all the squares of color.  That lamp shade is from here.  I think I have to have it.  So there it is - what do you think?  Any suggestions?  I haven't done pink in her room yet so I kinda wanted the girly look. 
Hope you had a great weekend!
xoxo
jessica


Friday, September 23, 2011

Delectable Apple Crisp

Last night I made this apple crisp

- it's kind of a mish mash of several recipes, but it turned out great so I wrote down what I did and decided to share (yeah the pic is not great because I had already started eating it then ran into the kitchen to snap a pic before I gobbled it all up).  In my opinion here are the secrets: fresh vanilla bean, salt, pecans.  Those three things combined with the usual apple crisp ingredients make a rich, flavorful dessert.  AND bonus - it's wheat free (not necessarily gluten free because of the debate over oats and cross contamination, but oats in and of themselves don't contain gluten.  I think. ) 
Anyway here's the recipe!
Serves 4:
3 large apples peeled, cored, and sliced thinly
1 T. granulated sugar
3/4 cup of pecans
1 vanilla bean
3/4 cup of quick oats
1/2 cup of packed brown sugar
1 tsp cinnamon
5 T butter
1/2 tsp salt


Preheat oven to 350.  Lay the apples in a tart plate or pie plate.  Sprinkle the granulated sugar over the apple slices.  In a medium bowl place the pecans, oats, brown sugar, and cinnnamon.  Slice a vanilla bean in half and scrape out the seeds - add it to the dry ingredients.  Cut the butter in - then with a sharp chopper, chop all the ingredients together until it looks all pretty and crumbly.  Pour this mixture over the apple slices.  Lastly sprinkle the salt evenly on top and bake for 20 - 30 minutes.  Don't over bake.  Since the apples are sliced thinly they should take that long to bake.  Remove from the oven and let cool slightly then serve it up with ice cream!  Yum!  Have a great weekend!
xoxo
jessica

Wednesday, September 21, 2011

{DIY} Anthropologie-inspired Headband

Okay, sincerest apologies for flaking out on you for the last week.  I didn't really mean for that to happen, but I was in the process of getting our family completely out of TN and down to FL.  We will be here for the next 2 months before we move to Japan.  BUT I did manage to whip up this little headband last night and I wanted to share it with you. 
 I haven't done anything Anthropologie in a while
- and I was craving something in their style. 
Here's Mine:

Here's Anthros:

I made mine out of cotton, but theirs is made using a rayon fabric and I think it would be great to make another one using that. 
Here's what you'll need:
1/2 yard of cotton or rayon
(I used Anna Maria Horner's LouLouThi)
iron/pins
scissors/thread/sewing machine
a 6" piece of 3/4" elastic

Step 1:  Cut 1 strip (the one you want to make the knot in) 6"x26".
Cut another strip 6"x22".
Step 2:  Fold each strip in half, length-wise and sew right sides together along the long edge.

Open that seam and press it flat.
(I changed fabrics half way through...sorry for the confusion)

Step 2:  Turn that tube right sides out and repeat with the other strip of fabric.

Now you should have 2 strips, one 4" longer than the other.

Step 3:  Tie a knot in the middle of the longer strip.  Pin it on top of the shorter strip.


I kind of pinned it so it would look like it was flowing, rather than just flat.

Step 4:  Sew this piece onto the bottom piece - you just need a few little stitches to keep it in place.  Turn the raw edges under and sew them down.
Also secure the knot with a few stitches.

Step 5: Cut a 5" square.

Sew it into a tube like you did with the strips at the beginning.  Turn it right sides out.

Step 6:  Slide the elastic inside this tube.  Then put the elastic and little tube inside the larger - tucking in the raw edges of the larger.  Stitch across.
Step 7:  Now try it on your head, and pull the elastic until it meets the other end of the headband and feels comfortable on your head.  Keep your finger where the stretched elastic and free end of the headband meet.  Take it off your head and put a mark on the elastic where your finger is.  Scrunch up the little tube until the raw end matches up with the mark on the elastic.  Slide the elastic and little tube into the open end of the headband and sew across.

Enjoy your new headband!
happy wednesday
xoxo
jessica

Monday, September 12, 2011

Halloween Outfit Part 2: {DIY} Tulle Skirted Leggings

These are so simple to make - you can do it in about 15 minutes.  I didn't even make an actual skirt.  Anyone can do this!! 
Here's what you'll need:

Step 1:  Cut the tulle into 10" x 10" squares.  Overlap two squares and pinch them together at the top.

Pin them along the waistband of the leggings.

Step 2:  Put elastic thread onto your bobbin and regular thread through the needle of your machine.  Sew the tulle on - just under the waistband.
Be sure to sew back a few stitches and then forward when you reach the end - otherwise the elastic thread will come undone.

And that's it!  Now, from what I've read, you should really hand wash tulle.  So I guess these aren't really roll around in the mud pants :)  But they sure are cute.

Happy Sewing and Happy Monday!
xoxo
jessica


Sunday, September 11, 2011

God Bless America

We will always remember 9/11.
Those who served and their families.

Friday, my hubby swore to serve and protect our nation
and became Lieutenant Broyles of the U.S.Navy.
We feel it a great honor to serve our wonderful Country. 
May God always bless America.
xoxo
jessica

Friday, September 9, 2011

Halloween Outfit Part One: {DIY} Applique T-shirt


Here's the great thing about this project: there's no construction of clothing. 
It's all embellishments.  That means it's EASY!
The first little dip in temperature had me feeling all fallish and halloweenish(?), so I headed out to the fabric store to scope out the Halloween fabric.  I came upon this adorable stuff from Riley Blake Designs by My Mind's Eye "Boo to You" - orange scatter
I knew those little creatures would make the perfect applique for a Halloween T-shirt for Charlotte!
This is a great way to get a one-of-a-kind look for your little one, and they can help you design it!
Charlotte picked out each little character for her shirts.
I don't know what really gave me the idea for the Tulle Skirted Leggings, but I'm kinda in love with them.  I'll put up a tutorial on Monday for those.
 But today we're going to focus on the shirts.
Here's the supply list.

Let me say - you really need to try to find the Steam-a-seam stuff. It is a.ma.zing!
 Really made this whole process easier.  I'll explain how to use it - keep reading.
I also added that little ruffle trim - it's actually elastic with a ruffle along the edge.  I found it at my fabric store, but I'm not sure what brand it is.

Step 1:  Select some characters from the fabric and cut them out.  Then peel back the paper portion of the Steam-a-Seam and lay your fabric pieces on top - press them into the S.a.S. with your finger.
Cut out each shape exactly the way you would like it to appear on for the applique.
Now you need to peel the paper off the fabric. 
You will see a sticky webbing magically left on the fabric.
Position your appliques where you would like them to live.  You can stick them to the shirt, even try it on, and if you don't like it just peel it off and restick it until you get it right. 
I'm telling you I love this stuff. 
 I put the center applique on first - 2" from the neckline.

Once you have it where you want it, iron it to the shirt.
Step 2:  Okay - now it's time to sew. 
Place the stabilizer behind the appliques and the layer of the shirt they are stuck to.
Set your machine to a zig-zag stitch.  Then adjust the width and length of the stitch.  I found a width of 3 and a length of .5 worked well for me, but I would suggest playing around on your machine first until you find the width you like.

Take  your time and stitch around the edge of each applique.  Be sure that the back layer of the shirt stays out of the way, and that the shirt doesn't bunch.

Step 3:  Clip the threads and gently pull off the stabilizer.
And that's it!!  Personalized, adorable little shirts. 

I'm dying to make more - it's kind of addicting. 
Hope you give it a try!
Have a great weekend.
xoxo
jessica

Thursday, September 8, 2011

*Inspired Homemaking* - Fall Ideas

Haven't done one of these in a while - but here are some of my favorite things floating around blogland.  Happy Thursday!
No matter what the weather, it feels like fall everytime I look at
this adorable bag by Flamingo Toes!
Get the how to here.

This football banner is super cute!

 
Need a quick scarf?
Tristin from Two Girls Being Crafty has a short little tutorial for this great jersey knit scarf!


 I fell in love with this Candy Corn Cheesecake!

And here are a few of my fall projects from last year - in case we hadn't met yet :)

The Anthropologie-Inspired Ruffle Scarf


Janie and Jack Inspired Pumpkin T-shirt


Ginger Molasses Cookies


Apple Biscuits


Apple Butter


Mmmm...Apples, spices, molasses....I love fall!
xoxo
jessica

Tuesday, September 6, 2011

{DIY} T-shirt to Tunic


Well it's football season!  Hurray!! 
But they don't make too many maternity sports t-shirts, so I decided to alter one I already had.

Although I'm using this as a maternity shirt, you could use this method to make a too-snug top flow a little better over curvy hips (eaiser than loosing 5 pounds, just sayin' :)

 
Here's what you'll need to make one too:
1 t-shirt to alter
1 t-shirt in coordinating color (or you could use fabric)
thread/scissors/pins
sewing machine

Step 1:  Decide how far up you would like the insert panels to go, then add 2 1/2" if you are addding the ties.  My total was 13 1/2" from the bottom of the shirt.  Cut along the side seam on both sides stopping at your mark.

Step 2:  Cut the panels.   Don't be too worried about this - measure 4 1/2" along the bottom of the fabric(or the hem of the shirt if you are using one).  Find the center of that measurement (2 1/4") and measure up 11 inches (or your desired height minus the 2 1/2").  Then cut from one edge of the bottom in a diagonal line to the 11" mark.  Repeat with the other side.  You'll have a triangle with a base of 4 1/2" and a height of 11".   Use this piece as a pattern and cut out one more triangle. 

I decided to use a shirt instead of fabric,
since it already has a nice t-shirt hem that would match the existing shirt.  If you are using fabric, you will need to hem the edge of fabric that will run along the bottom of the shirt.
If you would like to add the ties, cut out two strips, about 2 1/2" wide and 15"-18" long.

Step 3:  Pin one of the triangles right sides together along the cut side seam.  Be sure to line up the bottom edges.  When you get to the top of the triangle, place the tie there as well,
 right side down, and pin it on. 

Sew these pieces onto the shirt using a knit stitch ( looks like a lightening bolt). 
 Go slowly and be sure that your fabric doesn't roll.

Step 4:  Turn the shirt inside out.  Pin the other edge of the side seam to the other edge of the panel - right sides together - include the seam part of the tie.  Be sure that the tie itself is on the right side of the shirt.  Sew this seam using a knit stitch as well.

Step 5:  Repeat steps 3 and 4 on the other side of the shirt and you're done!

Comfortable clothing in no time at all!
Happy Football Season!!
xoxo
jessica


Monday, September 5, 2011

My Super Mommy Smoothie

So I was reading in Fit Pregnancy that pregnant/lactating women are supposed to have around 70g of protein a day!!!  Whoa....I definitely don't do that.  Non-pregnant/lactating women are supposed to eat 46g, which I probably didn't do either.  So I decided to start drinking smoothies in the morning for breakfast, and here is one I concocted that gets in over half of my protein requirement!

1 scoop chocolate Protein Powder
1/2 Banana
1/2 cup of Fat Free Greek Yogurt
1/2 cup of Organic Skim Milk
1 T of Peanut Butter
 3-4 Ice Cubes
Here's the nutrition information - it may vary depending on the brands you buy.  I use Dannon Plain Oikos Greek Yogurt and Six Star Whey Protein Powder.
445 calories
10.5 Fat (they're good fats :)
45.5 carbs
6 fiber
46.5 protein

I use my new little blender - it's the GE brand, that I actually bought at Wal-Mart for $20 - to blend it.
It turned out super yummy and keeps me full for a long time, AND helps give me the energy to chase a 3 year old and grow a baby :)
xoxo
jessica 

You may also enjoy...

Related Posts Plugin for WordPress, Blogger...