Friday, October 29, 2010

Give--away winner!


I'm happy to announce that the winner of the teacup applique dishtowel (chosen by random.org) is daniii!

She commented 4 times this past week - thanks so much for your thoughts dani!  You can send me your info and I will send you your dishtowel!  Thanks to everyone who commented...and if you haven't noticed I have reached 96 followers.  Once I reach 100, I will do a drawing and five lucky followers will get some kind of goodie.  I love you and you help me keep doing what I do!  Have a happy weekend!
jessica

Wednesday, October 27, 2010

DIY Braided T-shirt Yarn Headwrap


For those of you who don't sew at all - this is a dazzling no-sew project.  Of course, I copied it from Anthropologie.  Are you tired of me doing that?  Oh well, i guess you'll just have to live with it because I LOVE anthro and can't afford to buy stuff there.  So I copycat.  I have seen many tutorials bouncing around about making t-shirt yarn - which I'm all for - but the projects seem pretty lack-luster.  Once I saw this headwrap on Anthro...

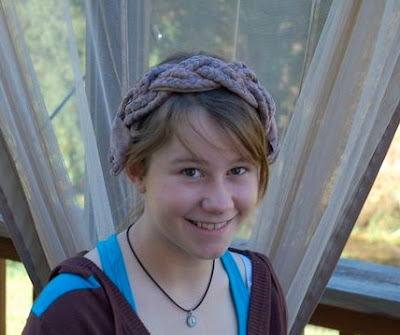
I knew it would be the perfect project for t-shirt yarn.  Assisting me on this project is my young lovely friend Lydia -

and we would like you to know that we spent $0 making this project... and you probably will be able to do the same!  Are you ready to make one?  okay....

Supplies:
1 or 2 t-shirts WITHOUT side seams and in the color you want (of course you can always dye it to any color...this is a great time to ask your hubby to clean out his t-shirt drawer)
(I used a men's extra large t-shirt)
Scissors
Water soluble pen
Hot Glue/ Glue Gun


T-shirt yarn is very simple and fun to make 
and this tutorial explains it well. 

MAKING THE HEADWRAP:
Step 1:  Cut the yarn into six equal lengths. 

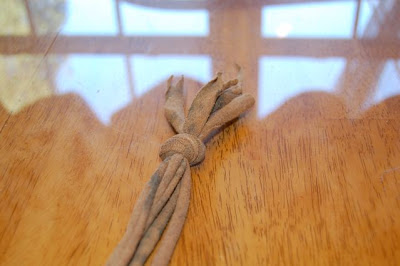
Knot 3 together and braid it. 

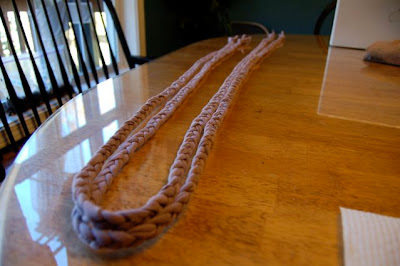
Braid the other three strips.  You should have two long braids like this:

Step 2:  Measure one braid and cut it into three equal parts.  Repeat with the second braid.  You will have six pieces of braid that should be the same length.

Step 3:  Heat up your hot glue gun.  You will need something to use as a backing.  I used some leftover pieces of t-shirt (like from the top of the shirt) but you could use ribbon too.  Cut three pieces of backing the length of the braids plus 10".  The extra length will be your ties at the nape of your neck.  Example: my braids were 26 inches so I cut three backing pieces at 36 inches.
Step 4:  Start with two braids and one piece of backing.  Put the two braids right side down (if you have a right side).  Using hot glue, glue the piece of backing to both pieces like this:

You will repeat this step with the other two pairs of braids.

Step 5:  Okay good!  Now you have three double-wide braids.  Lay them together like this:
To secure the end of your wrap, put some hot glue on both sides of the middle double-braid.  Squish them together so that they are touching.  This is really just to secure the end of your headwrap.

Step 6:  Braid the three large braids into an even larger flat braid.

Step 7:  Almost done!  Glue the other ends side by side just like you did the in step 5.  Use a little more of your backing material to wrap around the ends of your braid - secure it with hot glue.  I left a tail so that I would have two tails on each end to make my ties.
Here's what the back should look like:
Here's what the front should look like:

Now you can either wrap it around your head, or wrap it up as a gift for a friend!
good luck, jessica


Pumpkin - 2 year old style

Last Saturday we went to the farmer's market and bought this HUGE pumpkin.  Instead of carving it, we decided to do a more toddler friendly decoration.  Ryan printed out a pic of Dora.  Then he put masking tape all over one side of the pumpkin.  Then he taped the picture to the tape.

Using an exacto knife, he cut out the outline of Dora - cutting through the paper and the tape-peeling away the fragments as he went.  Then all three of us got out the permanent markers and paint pens and went to town.

When we were done, we peeled all of the tape off- and it left us with this lovely outline of Dora! 

Charlotte thinks it is super cool. 

The variations of this could be endless - so use your imagination and have fun! 
If you make one of these, upload the pic to the flickr pool!

Tuesday, October 26, 2010

Knot a Knitter

 hmmmmmm.......
I followed the pattern.
How did that happen?
It looks like someone opened their clutch purse and shoved it on her head.
This is proof that I mess up - not everything I make turns out well.
But we shouldn't give up should we?
So..... I threaded a big needle and took a larger seam along the sides; then I finished the tassels.  
The first tassels I made were laughable - I'm not even showing them to you.  

It still looks kinda funky - like she's a little who from who-ville maybe? 
(even she looks unsure...)
She's so cute though I think she can pull it off.  
And it will keep her head and ears warm - that's the whole point anyway. 
(and if not, maybe I will just turn it upside down,add a snap, and put my wallet in it...)

If you didn't know before, you know now- my brain shuts down when I try to knit....(obviously)
I know I probably just need to do it more, but wow it is difficult for me to do.  However I like the end result of knitting and so today I went to a super cute yarn shop called Yarntiques. 
(Charlotte did NOT wear the hat to the store)
I bought these two yarns and some double pointed needles.
  
I really want to make these hand-warmers.  
I'll let you know how it goes :)  
If any of you are good knitters, I would appreciate any knitting tips - leave a comment!
 casting off - jessica

Monday, October 25, 2010

Aprons...and much more

Hey!  Hope you all had a great weekend - ours was filled with potty training, pumpkins, injured deer in our driveway and a mysterious house fly infestation, which I think was related to the injured deer.  Fun in the country!

BUT one of the things I did this weekend was enter the Prudent Baby Fat Quarter Apron Contest.  They have made a tutorial for an apron that can be made out of a fat quarter of fabric, and right now if you make one and send it to them, you are entered to win fat quarters of the ENTIRE collection of Anna Maria Innocent Crush!!  This tutorial takes about 20 minutes and is simple and easy to understand.  You have until November 10th at midnight to email them pics of your aprons and you can make as many as you want!  Perfect motivation to make gifts for the ones you love!
Here are the two I made:
Christmas Apron

Domestic Diva Apron

I'm just going to keep my cleaning supplies on this apron - then I just have to tie it on 
and I will be ready to clean like crazy.
  
At least that's the hope ;)
Have a great day..and coming soon - what my talented hubby did with that big 'ole pumpkin.
jessica

Saturday, October 23, 2010

Healthier Snacking


You know, by now, that we love football.  A large portion of our Saturdays is devoted to watching it.  AND we like to eat "football food" while we watch.  You know-foods that don't require utensils, like burgers, wings, chips and dip.  We really like to make onion dip and eat it with pretzels.  Usually I make it with reduced fat sour cream - which sounds like a healthy choice to me.  However, in an attempt to be even healthier Ryan and I tried substituting Plain Greek Yogurt for the usual sour cream.  It passed the taste test with flying colors -there was a little more tang, but we liked it over all.  We did add 1 1/2 packets of onion soup mix to compensate for the tanginess.  Anyway here is the really exciting part - the nutritional comparison.  I calculated this for 16 oz. of reduced fat sour cream vs. 16 oz of nonfat plain greek yogurt.

REDUCED FAT SOUR CREAM                                                      NONFAT GREEK YOGURT
Calories: 675                                                                                      Calories: 275  
Fat: 52.5                                                                                              Fat: 0
Sat. fat: 37.5                                                                                       Sat. fat.: 0
Carbs: 30                                                                                            Carbs: 18
Protein: 15                                                                                          Protein: 40

WOW! Can you believe that?!?  We were shocked.  So give it a try next time you're making dip - that way you can have that extra brownie for dessert ;)

Friday, October 22, 2010

I hate to see you go, but I love to watch you leaf...

The leaves are really lovely right now here in eastern TN.  Yesterday Charlotte and I took a  leaf-rainbow walk.  We tried to find a leaf of every color of the rainbow. It was amazing what we found just in our yard!
I was fascinated by the Japanese Maple which had green, purple, red, orange, and yellow leaves on it all at once!  Here is my collection of them, although I couldn't reach any of the yellow ones (and almost busted it trying to...)
After we had collected the leaves, we used double-sided tape to stick them to a piece of paper - trying to follow the order of colors in the rainbow.  Charlotte thought it was fun (I did too) and it is now hanging proudly on our refrigerator.
If you live where the leaves are changing - give it a try!  Then upload the pic of your art onto the Sew Homegrown Flickr Pool so we can all see how it turned out!  Happy Friday!  jessica

Thursday, October 21, 2010

*Inspired Homemaking*

Some great links to check out!
Easy and inexpensive wreath idea on Spartan Living:

I loved this advice about decorating on The Inspired Room.  
She is doing 31 Days of Autumn Bliss this month - lots of inspiration.

Great Tutorial on making a Snowball Quilt Block.  
It's a great one to start out with if you've never quilted.
It makes a beautiful quilt.

Over on How About Orange, jessica jones shares a
I think you could make them look Christmasy too.
Hope you feel inspired.
jessica

This year's costume...

recently Charlotte has been running around the house dressed up as a pirate.
When we ask her what kind of pirate she is she says, "a princess pirate".  So that is what we decided to dress up as for Halloween - a Princess Pirate.  Here's what it looks like:
Honestly the only thing I made was the crown/hat/eye patch.  The little red costume was a hand-me-down from Shannon's girls - thank you!  Upload pics of your costumes to the Flickr pool - I would love to have some ideas for years to come!
I also wanted to let you know that after the Ruffled Scarf Tutorial - I had a request for a custom ruffled scarf to purchase.  If you enjoyed that scarf, but are so busy you don't have time to make one - I would be happy to take orders.  You can either send me an email, or send me a custom request on my Etsy shop.  Here's the one I made for my first order:
Have a great thursday- it's almost the weekend!
jessica

Wednesday, October 20, 2010

*Giveaway* - Appliqued Bamboo Dish towel


This soft bamboo dish towel is just the thing missing from your holiday kitchen.  While not particularly one holiday theme, the warm colors of cranberry, red, and yellow remind me of cranberries and apples- sure to be in your kitchen this fall and winter.

The appliqued teacups are made from AMH's new fabric collection "Innocent Crush".  Leave a comment any time this week and you will be entered to win!  Giveaway will end next Wednesday at midnight.
Don't forget to upload pics of your Sew Homegrown projects to our Flickr pool!
Thanks for reading!
jessica

Tuesday, October 19, 2010

Organizing...

so you know, some crafty people aren't always the neatest people.  I fall into that category for sure.  I LIKE things neat...I'm just too busy using the right side of my brain to have to worry about structure and organization.  BUT the fact of the matter is...I am happier when everything is in it's place - I have to remind myself that being organized actually helps me craft MORE because I am not spending 25 minutes hunting down the other knitting needle...so please don't judge me ;) Here are some BEFORE pics of my crafting space.  Yes I use the top of the piano for stuff...


I don't have a sewing room, this is an area to the left of the living room - I think you're supposed to use this nook for a dining room, but since we have an eat-in kitchen, we decided to use it as a piano room/play room/sewing room.  I know that 3 uses for one room is kind of a lot- so it will really help when it is organized.  Here's what I did:
First I folded the fabric and put it into a little bookshelf turned onto it's side.

I cleaned everything off the top of the piano, and put two baskets up there with the scrap fabric - one basket for cool colors, one for warm colors.
I used a box that had canning jars in it to organize my trims.
I love to hang onto these zipped up plastic bags that mattress pads and other bedding comes it- they are perfect for scraps such as felt.  Once again I have a bag for cool colors and a bag for warm colors.


So hurray!  
Everything is so much nicer 
- once more, here's the Before...
and After...
Before...
 After...
 YAY!  do you have any organizing secrets?  Let me know!
jessica

You may also enjoy...

Related Posts Plugin for WordPress, Blogger...