Showing posts with label children. Show all posts

Tuesday, June 18, 2013

{Create} Fabric Hairbow


As much as I craft you would think I could make a decent ribbon hairbow.  But the thing is - I really stink at making ribbon hairbows.  I just can't seem to get it right - even when I follow really great tutorials.  So instead, I dug through my fabric stash and created this little bow.


I love it.  
It's so simple to make.  
It will be the perfect accessory to your girl's summer wardrobe(or yours!).  
Just follow the easy instructions below!!!

You'll need:
 a small square of fabric - about 6"x6"
a hair clip
some trim or ribbon for the center
a glue gun
a sewing machine/thread/scissors/etc.

STEP 1:
Cut a 4"x2" rectangle out of card stock for a pattern.  You don't have to do this, but I like to so that I can position it anywhere on the fabric.  Cut out two rectangles.

STEP 2:
Pin the rectangles right sides together.  Place marks 1" apart along one of the long sides.  
Preferably in the center.  This will be your opening for turning.

STEP 3:
Use a 1/4" seam allowance and stitch around the rectangle, leaving the 1" opening.  Clip the corners.

STEP 4:
Turn it right sides out and topstitch the opening closed.  Press well.


STEP 5:
Now, scrunch up the center of the bow.  Just fiddle with it until you like the way it looks, then top stitch right over the folds to hold it in place.  


 STEP 6:
Select your trim and wrap it around the center of the bow - gluing it or hand sewing it in the back.  Lastly, glue the clip to the back of the bow and enjoy!!

Happy Sewing!
jessica

Friday, November 4, 2011

It's a....

and we couldn't be more thrilled!
I'm already working on her baby quilt - made from those gorg Anna Maria Horner Folksy Flannels!  More on that later.  Hope you have a great weekend!
xoxo
jessica

Monday, October 31, 2011

Our Halloween

This post is really for my hubby - who's away at training - but of course, I assume everyone will enjoy looking at our beautiful daughter ;)


I'd love to tell you that I made at least part of her costume...but it's just not true.

I don't think she minded.


It's good to be three.  and we are very three.

We ate our traditional chili.  
Every Halloween for as long as I can remember :)


Dora made an appearance on the pumpkin.

We hope yours was full of treats!


xoxo
jessica and charlotte

Tuesday, October 25, 2011

The whole room...

Here is the quilt - the final piece of Charlotte's Japan Room!  It's adorable Valori Wells fabric and mom quilted it on her sewing machine.  

Here's the whole room laid out:

Now tomorrow it will be boxed up and we're starting the shipping process...kinda exciting!!
xoxo
jessica

Wednesday, October 5, 2011

{DIY} Love You to Pieces Skirt


Hey!  I'm excited to share this tutorial with you.  
This is another great way to use up scraps.  

My mom had made a quilt using Anna Maria Horner's new line Loulouthi -
and she had some wonderful scraps leftover.
We found this skirt as inspiration on Pinterest 

(how adorable is that?) 
and decided to make our own!  
Here are the supplies you'll need (I made a size 3T):
scraps of fabric that equal around 1 - 1 1/2 yards
24" of 3/4" elastic
scissors/pins/iron/thread/sewing machine

Step 1:
Cut the pieces.
You will need a Yoke Waistband, Skirt Fabric, and Contrast Band Hem.


Okay I know that's kind of a crazy picture.
I pieced a bunch of things because I was working with smaller scraps, but here are the dimensions explained:
Yoke: 5"x 23" (mine were in two pieces 5"x 12" and I had to sew them together)
Skirt: 8 1/2"x 46" when sewn together.  You will need to add an inch for every piece to allow for the seam allowance - when I laid these all out after cutting it measured 53", but after sewing them it measured 46".
Contrast Band: 3" x 46" when stitched together.  The same applies here - you may have to piece a few strips, but once you sew it together it should measure 3" x 46".

Step 2:
Sew all the skirt pieces together.  You should have a long piece that measures  8 1/2" x 46".
Serge or zig zag all of the seams.
 Step 3: 
Sew the Contrast Band strips together (right sides together) so that you have on long band 3" x 46".
  Lay it's right side against the wrong side of the skirt panel and pin. 
(This may seem wrong, but go with me here)
 Sew along the edge using 3/8" seam.
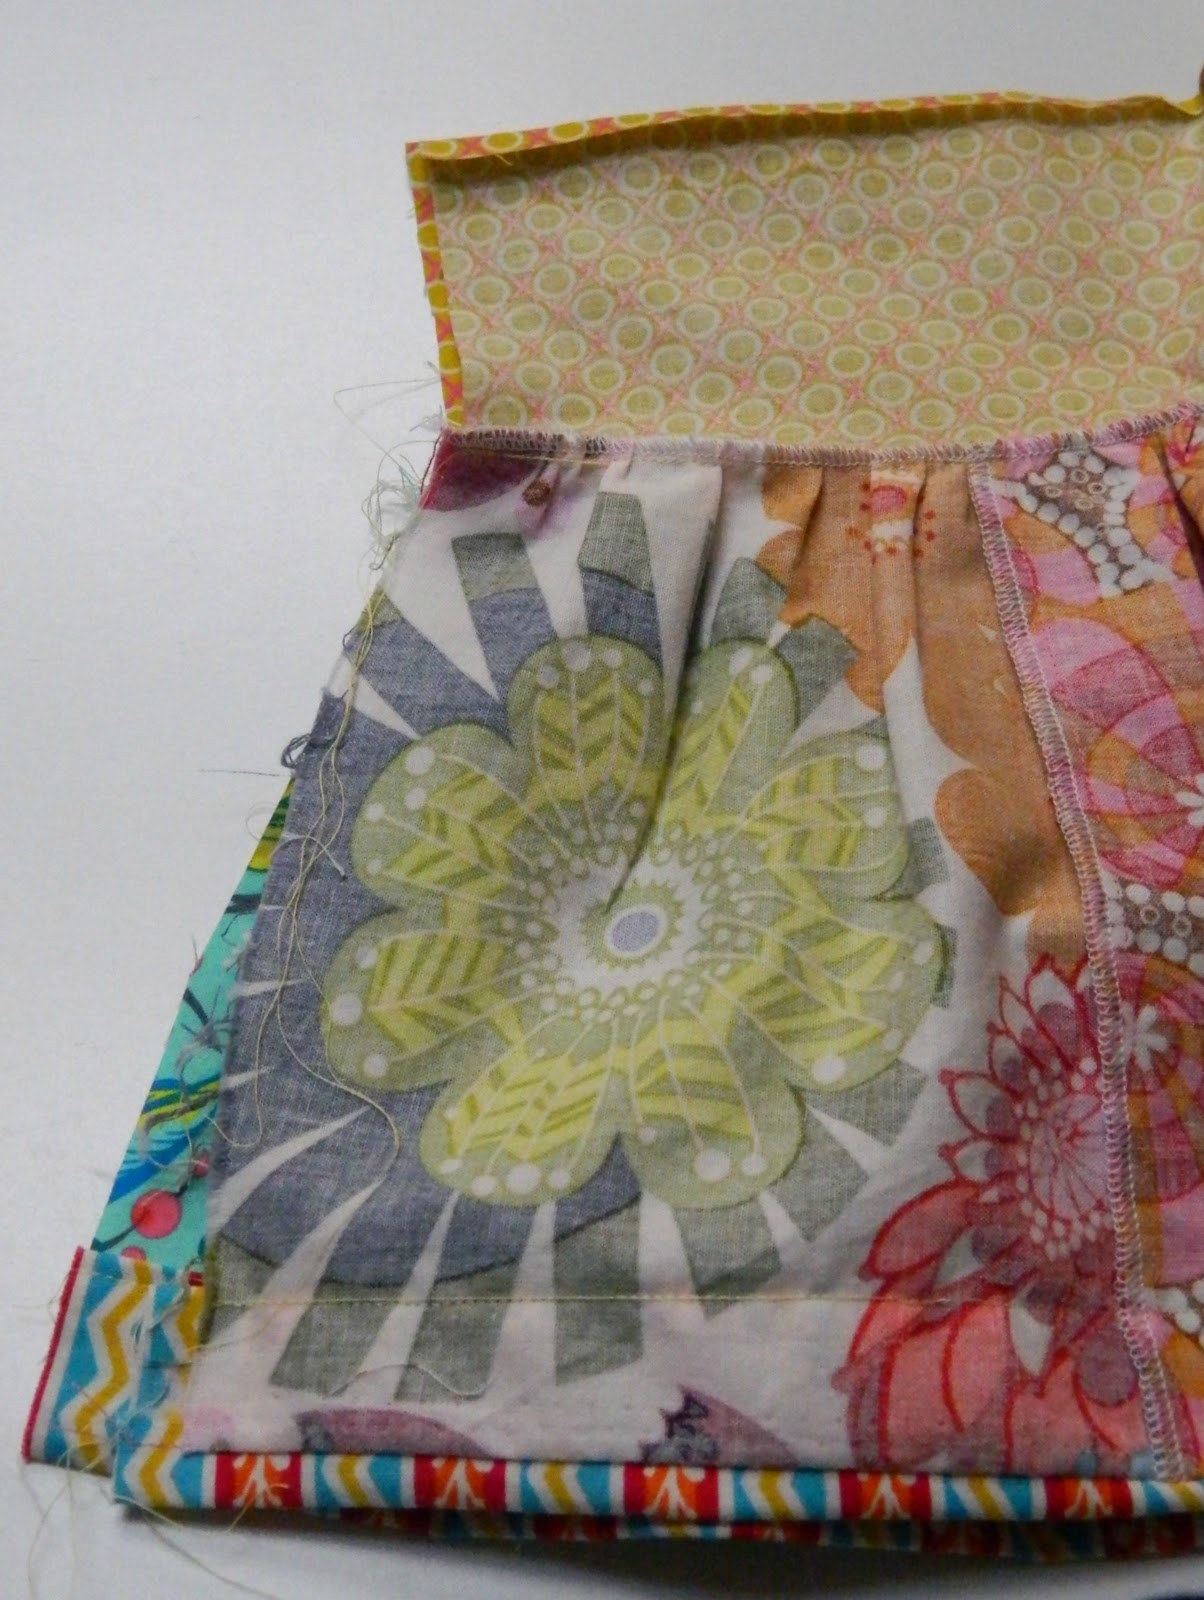
When you have finished, open it up and it will look like this:

Step 4:
Press 1/4" of the band toward the wrong side.
  

Then press the band up about 1" and pin it to the skirt panel.


Top stitch it in place.
Here's how it should look: front and back.

Step 5:
Using a basting stitch, sew along the top of the skirt panel twice and gather so that it measures 23".

Step 6:
Pin the yoke waistband right sides together along the gathered edge.

Stitch in place.
Zig zag or serge the seam then press it towards the skirt.
It should now look like this:

Step 7:
Press the top of the waistband under 1/4", then pin the edges of the skirt right sides together
and sew the side seam.
 Zig zag or serge the side seam.  

Step 8:
Fold the top of the yoke down about 1 1/2".  

Leave about a one inch opening, and stitch it in place.

Step 9:
Fasten a safety pin to one end of the elastic and run it through the casing.

Measure it on your kiddo to get the right size, then stitch the two elastic ends together.

Slip the elastic inside and topstitch the opening closed.

Step 10: 
This step is optional but it makes the garment look a little more professional and it will keep the elastic from rolling when you wash it.  Scoot the elastic to the bottom of the casing, and top stitch around the top of the yoke, about 1/8" down from the top.

When you are finished, it will look like this:


That's it! Enjoy watching your cutie spin and play in her new skirt!


happy sewing,
xoxo
jessica

Monday, September 26, 2011

Inspiration Board: Charlotte's Three Year Old Room

In one attempt to distract myself from the craziness that is my life...I've started planning Charlotte's room for our home in Japan.  I want to be able to make everything now (curtains, pillows, quilt), so that when we get there, her room can be a happy cozy place in a short amount of time.  Plus it gives me something to do now :)  So here's my inspiration.  That fabric is Valori Wells Wrenly - it's so happy and I think it will transition well from 3 - 6 yrs old which will be her ages while we are in Japan.


The plan for the bed is from here.  Ryan is going to get it all cut out, and then we'll ship it Ikea-style and assemble it when we get there.  We already have that green chair, and I think a pillow out of that bird fabric will look adorable on it.  I bought a rug at Old Time Pottery for $50 that looks very similar to the one shown here.  It's very cheery and I like all the squares of color.  That lamp shade is from here.  I think I have to have it.  So there it is - what do you think?  Any suggestions?  I haven't done pink in her room yet so I kinda wanted the girly look. 
Hope you had a great weekend!
xoxo
jessica


Monday, September 12, 2011

Halloween Outfit Part 2: {DIY} Tulle Skirted Leggings

These are so simple to make - you can do it in about 15 minutes.  I didn't even make an actual skirt.  Anyone can do this!! 
Here's what you'll need:

Step 1:  Cut the tulle into 10" x 10" squares.  Overlap two squares and pinch them together at the top.

Pin them along the waistband of the leggings.

Step 2:  Put elastic thread onto your bobbin and regular thread through the needle of your machine.  Sew the tulle on - just under the waistband.
Be sure to sew back a few stitches and then forward when you reach the end - otherwise the elastic thread will come undone.

And that's it!  Now, from what I've read, you should really hand wash tulle.  So I guess these aren't really roll around in the mud pants :)  But they sure are cute.

Happy Sewing and Happy Monday!
xoxo
jessica


Friday, September 9, 2011

Halloween Outfit Part One: {DIY} Applique T-shirt


Here's the great thing about this project: there's no construction of clothing. 
It's all embellishments.  That means it's EASY!
The first little dip in temperature had me feeling all fallish and halloweenish(?), so I headed out to the fabric store to scope out the Halloween fabric.  I came upon this adorable stuff from Riley Blake Designs by My Mind's Eye "Boo to You" - orange scatter
I knew those little creatures would make the perfect applique for a Halloween T-shirt for Charlotte!
This is a great way to get a one-of-a-kind look for your little one, and they can help you design it!
Charlotte picked out each little character for her shirts.
I don't know what really gave me the idea for the Tulle Skirted Leggings, but I'm kinda in love with them.  I'll put up a tutorial on Monday for those.
 But today we're going to focus on the shirts.
Here's the supply list.

Let me say - you really need to try to find the Steam-a-seam stuff. It is a.ma.zing!
 Really made this whole process easier.  I'll explain how to use it - keep reading.
I also added that little ruffle trim - it's actually elastic with a ruffle along the edge.  I found it at my fabric store, but I'm not sure what brand it is.

Step 1:  Select some characters from the fabric and cut them out.  Then peel back the paper portion of the Steam-a-Seam and lay your fabric pieces on top - press them into the S.a.S. with your finger.
Cut out each shape exactly the way you would like it to appear on for the applique.
Now you need to peel the paper off the fabric. 
You will see a sticky webbing magically left on the fabric.
Position your appliques where you would like them to live.  You can stick them to the shirt, even try it on, and if you don't like it just peel it off and restick it until you get it right. 
I'm telling you I love this stuff. 
 I put the center applique on first - 2" from the neckline.

Once you have it where you want it, iron it to the shirt.
Step 2:  Okay - now it's time to sew. 
Place the stabilizer behind the appliques and the layer of the shirt they are stuck to.
Set your machine to a zig-zag stitch.  Then adjust the width and length of the stitch.  I found a width of 3 and a length of .5 worked well for me, but I would suggest playing around on your machine first until you find the width you like.

Take  your time and stitch around the edge of each applique.  Be sure that the back layer of the shirt stays out of the way, and that the shirt doesn't bunch.

Step 3:  Clip the threads and gently pull off the stabilizer.
And that's it!!  Personalized, adorable little shirts. 

I'm dying to make more - it's kind of addicting. 
Hope you give it a try!
Have a great weekend.
xoxo
jessica

You may also enjoy...

Related Posts Plugin for WordPress, Blogger...