 Just had to give you this link - amazingly cute fabric ( including Anna Maria Horner) on huge sale!!!

Wednesday, June 30, 2010
SALE
Just had to give you this link - amazingly cute fabric ( including Anna Maria Horner) on huge sale!!!
Firecracker Hairbow

As you know, the Fourth is this weekend - and Charlotte had NOTHING patriotic to wear. If you find yourself in the same dilemma, you can take 30 minutes and make this cutie little hairbow to get everyone in the American Spirit.

You will need:
Red ribbon
Blue ribbon
White ribbon
Something for the middle
(button, gemstone, bead, etc.)
A hair clip
Hot glue gun and hot glue
Scissors
Plug in your hot glue gun and let it heat up.
Begin with the red ribbon. Drape it over your hand, like this.

Wrap it around 8-10 times.

Cut the ribbon from the spool.
Cut a small piece of red ribbon - about 3-4 inches. Lay it flat.
On top of that small piece, lay your loop of ribbon.

Tie the small piece around the loop, into a knot.

Tie the small piece around the loop, into a knot.

Snip the loops of both sides, so that the ribbon fans out.
Repeat this process to make another red loop, a white loop, and then a blue loop -
I made the blue loop smaller.

Lay one of the red pieces on a table. Put a dot of glue in the center. Lay the other red piece on top, perpendicular to the first one - making a cross. Next glue the white piece on, and then the blue piece.

When the glue has dried, tie a piece of ribbon around the entire thing, to help hold it together. Now put a dot of glue in the center of the blue piece and glue on your centerpiece.
Lastly, glue the large "firecracker" to a clip.

More Fourth of July fun coming tomorrow!
jessica
Monday, June 28, 2010
Step Up and Bloom

I had mentioned before, when we were staying with that lovely family from church, that I would share with you how to make this adorable little ottoman (or stepping-stool however you want to use it). You are not going to believe this - it is made out of four 46oz juice cans.

It is incredibly sturdy - I can stand on it, and it is just the right size to put in front of the bathroom sink so Charlotte can wash her hands.

If you would like to make it, here is what you will need:
1 1/2 yards of fabric
(either all the same, or coordinating)
Scissors
Fabric Pen
Scrap of batting
Polyfil Stuffing
4 empty and washed 46oz juice cans
Open your cans like this,

so that the tops and bottoms will still be intact.
Sewing Machine and thread
Yard stick
Pins
Step 1: Lay out the fabric you will use for the top and bottom pieces. Put the juice cans on the fabric like this - forming a little flower design.

Step 3: Cut out 3 flowers - two out of fabric, and one out of batting.
Step 4: Lay out the fabric you will use for the side. Cut a strip 8" x 38".
Step 5: Pin the strip to the bottom flower - right sides together.
Step 6: Stitch around the edge, using 1/2" seam - leave a 3 inch opening. In the corners of the flower, you will need to take a little pleat.

Step 8: Clip the fabric at the curves. Turn it right sides out.
Step 9: Slip the cans in one at a time. Stuff the top with the stuffing to your desired poofy-ness.
Step 10: Hand whip the opening closed.

Enjoy!

Saturday, June 26, 2010
Blueberries

Today we went exploring on a mountain near our new home.
And by exploring , I mean climbing straight up and up and up for an hour and a half.

It was really gorgeous scenery though
(but I don't think my legs are going to be able to move tomorrow).

Along the path we found tons of wild blueberries...and being the nature children we are,
we stopped to pick them.

They were really sweet and tasty - Charlotte put more in her mouth than in the cup :)
We collected about 1 Cup of blueberries.

I used them tonight in a dessert, which I will tell you about next week.
All-in-all it was a lovely summery day - hope yours was too!
Friday, June 25, 2010
30 Minute Head Scarf

So because of the big move, my daughter has pulled out the majority of her hair. It seems to be a coping mechanism that some kids use and it's totally normal. However, it is very difficult to find cute ways to do her hair...there is a limit to how you can comb 3 strands of long hair to cover an entire head. Plus it looks way unbalanced because her bangs are still thick, but the back is all thin and patchy. (I know I was spoiled because she had SO much hair at such a young age...) Anyway, this is one of my solutions (if you have any more please let me know).

This literally took 30 minutes last night. Here we go.
You will need a scrap of fabric that can be folded on the bias, some ribbon, thread, and sewing machine.
Fold the fabric on the bias.
Measure 16 inches along the fold ( you may need to make it larger if your child is older).

Make at mark at 16".
Take the left bottom corner and fold it up to meet the 16" mark - this will help you cut a straight line. 
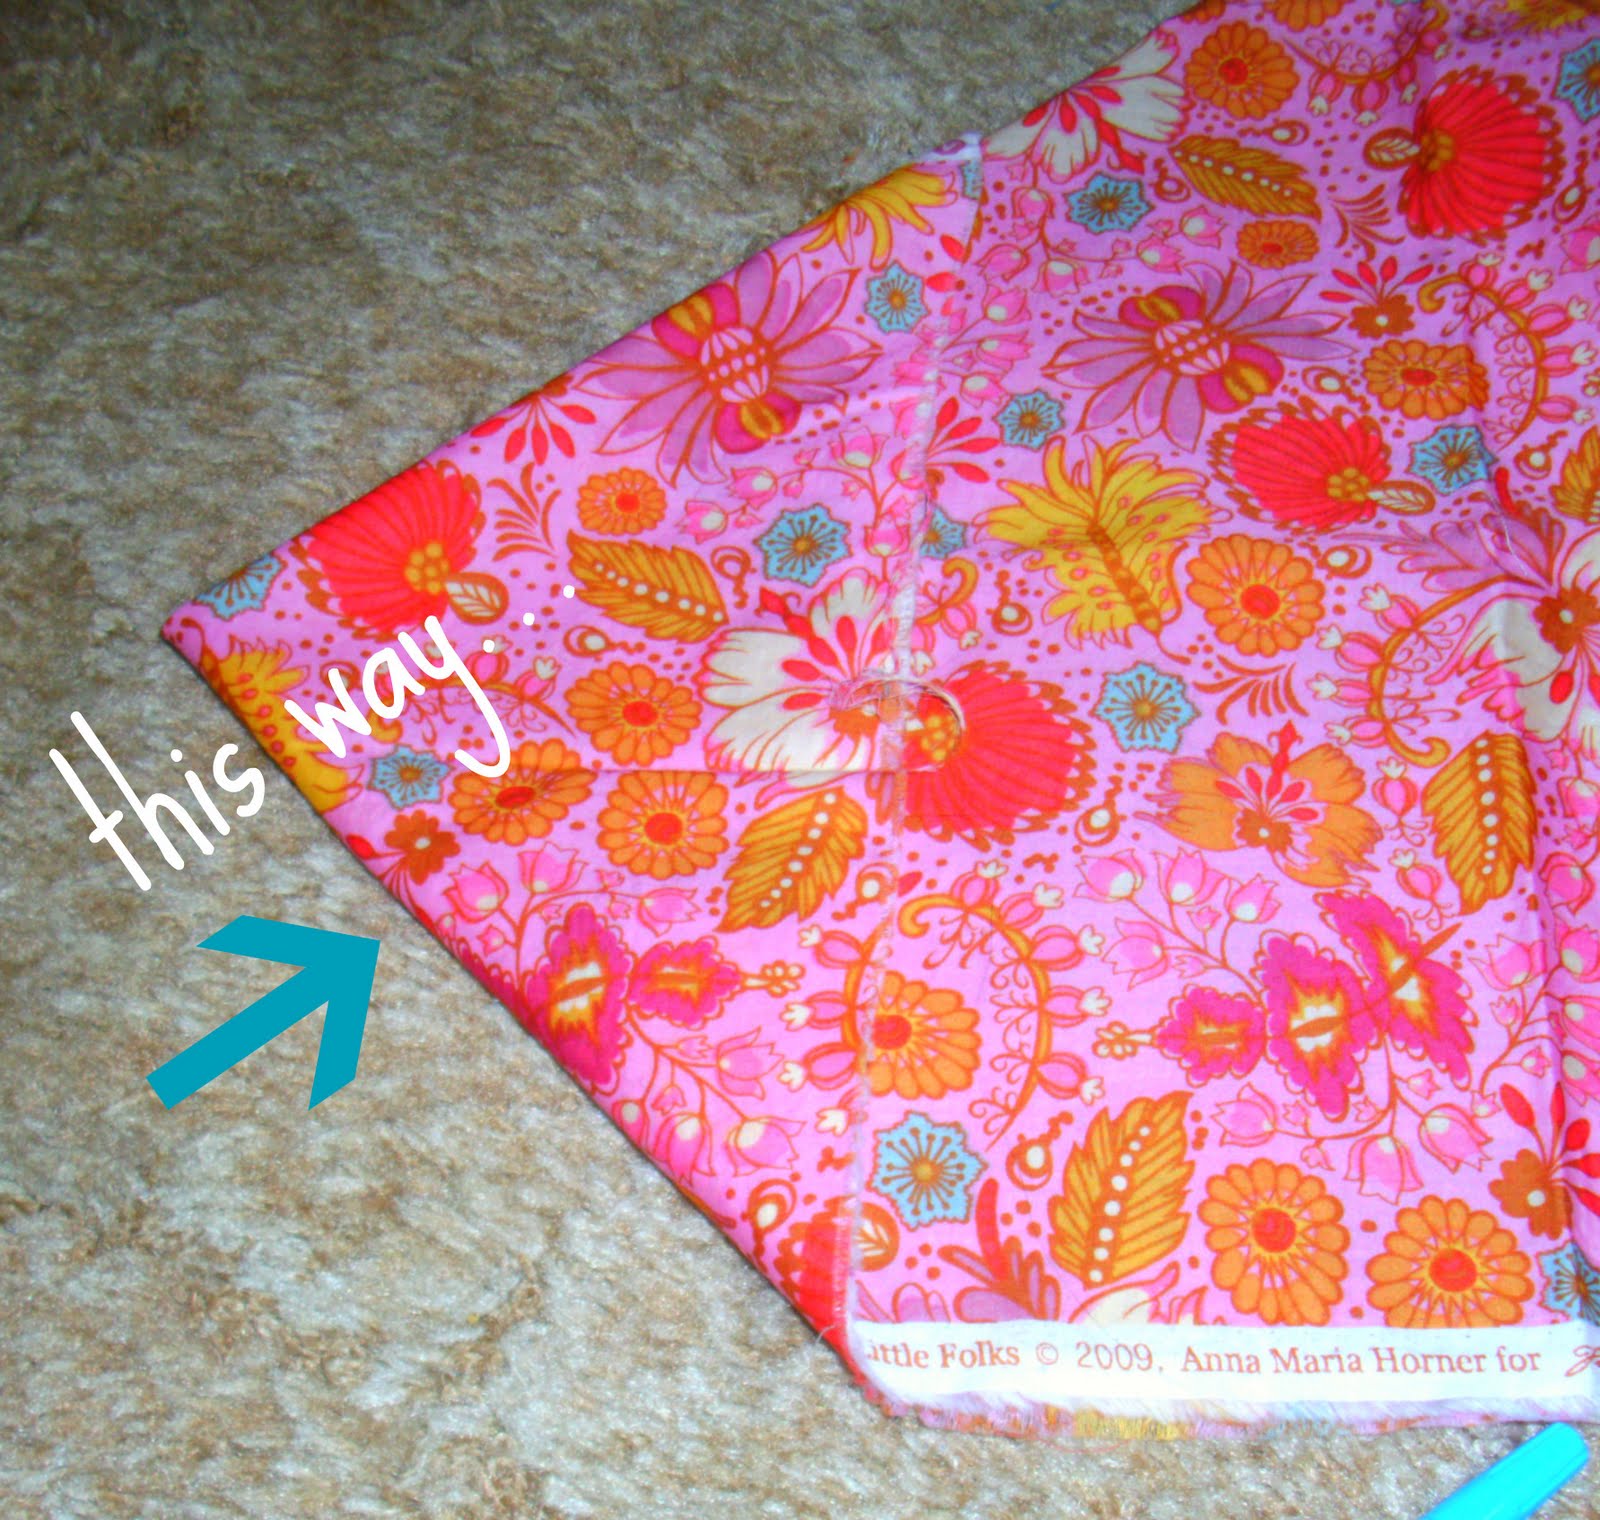
Draw a line from the 16" mark down to the selvage. Cut along that edge.
Then cut along the fold that is 16" long. You should have a triangle.
Zig-zag stitch or surge the two short sides.

Lay it flat and pin on a cute piece of ribbon.
Top-stitch the ribbon along the longest side of your triangle. Done.

Labels:
children,
yard or less


Wednesday, June 23, 2010
Getting settled...
Wow- this past week has been crazy! We are finally into our home and just got the internet hooked up like 30 minutes ago. So - how have you been?

While we were searching for a home to rent we enjoyed the gracious hospitality of a couple from church. Their home was filled with many interesting and beautiful handmade items,

made by his mother who lives in an Amish community.

Handmade quilts, hand-hooked rugs,

(how amazing is that?! doesn't it look so Anthro? She would buy wool coats from thrift stores and cut them into strips. She then hooked it through burlap. wow.)
I am going to embark on the hand-hooked rug adventure once we are settled, and very soon I will show you have to make an ADORABLE little ottoman that they had at their home.
( I forgot to take a pic)
So that's a small peek into what we have been up to. I am so happy to have a home again and to be blogging again, and I can't wait to start sewing again. Hope you have been well!
Friday, June 18, 2010
If you behave we will...
Rewards can be a great parenting tool. But do you ever feel like the only ones you can think of involve food or candy? Those rewards certainly have their place - but wouldn't it be great if we could reward our little ones with things other than food? Things that don't clutter up your home. Things that are inexpensive. Here is my
Top 8 Non-Food Rewards For Good Behavior
(p.s. most of these are for younger kiddos)
Do you have any more suggestions? Please comment.

1. Water Balloon play-time
2. Fun Sparkly Balloon from grocery store
3. New sticker pack
4. Bath Crayons
5. Movie at the big theater
6. Art Date with mommy or daddy
( photography, painting, sewing, drawing, etc. Good one-on-one time)
7. Trip to the Zoo
8. I-tunes purchase
Wednesday, June 16, 2010
A Gift for you
So since I have been bumming off of my parents and in-laws...I have had a light load of cooking, cleaning, and laundry. So I had plenty of time to come up with a FULL WEEK ( it may last you longer than a week) of meals for you (and me to use when we move into our new house and I am too busy unpacking to make a grocery list.) This week of meals is a typical week at our house. My husband has a gluten sensitivity - not an allergy, but he gets sick if he has too much gluten. You can learn more about that here. Anyway, I try to limit our intake. So you can download the grocery list here. The meals and links for the recipes are below. Have a lovely week - now you have more time for crafting and sewing!
Meals:
Sunday: Lunch: Chicken Pot Pie, Fruit, Mac & Cheese Dinner: Homemade Pizza
Monday: Tilapia, Broccoli, Rice-a-roni
Tuesday: Bacon-wrapped chicken breast, Sweet potatoes, Southern Zucchini
Wednesday: Taco Salad
Thursday: BLT Spinach salad, Fruit, Cheez-it chicken fingers
Friday: Lasagna, Green beans, Peach Cobbler
Saturday: Hamburgers, French Fries, Oatmeal Craisin cookies
Recipes:
Sunday: (I make the pot pie and mac and cheese the night before, then after church just heat them in the oven for 20-30 minutes while you slice the fruit)
- Chicken Pot Pie
- Macaroni and Cheese
- Sliced Fruit
- Instructions on Pizza mix box - toppings are up to you
Monday:
- Tilapia: Heat some oil in a skillet. Coat the fish in breadcrumbs and salt and pepper. Cook for about 3 minutes on each side or until it flakes with a fork.
- Steam Fresh Broccoli in microwave
- Rice-a-Roni directions on box
Tuesday:
- Bacon-wrapped chicken breast: Heat a skillet on medium heat. Wrap each chicken breast with one piece of bacon. Cook about 6 minutes on each side, until cooked through. When the second side is almost done, slice 1 or 2 slices of pepper jack cheese and place on top of each breast.
- Wash sweet potatoes. Poke each one with a fork. Bake in the oven for 45 min - 1 hr on 350.
- Southern Zucchini
Wednesday:
- Taco Salad: Brown the ground beef (or turkey). Add the taco seasoning and black beans. Chop up tomatoes and avocado. Layer the salad like this: Tortilla chips, lettuce, meat/beans, cheese, tomatoes, avocados, salsa, and sour cream. (one of the easiest meals EVER)
Thursday:
- BLT Salad: Cook the bacon. While that is cooking, chop up the tomatoes. Toss together with spinach leaves and your favorite dressing ( I use blue cheese).
- Slice the left-over fruit from Sunday
- Cheez-It Chicken
Friday:
- Lasagna
- Peach Cobbler
- Steam-Fresh Green beans - cook in microwave
Saturday:
Labels:
free downloads,
recipe
Sunday, June 13, 2010
American As Apple Pie


You will need:
A clean, dry cream cheese container
Light brown felt
Other assorted felt colors
A scrap of printed cotton
Ribbon
Stuffing
Hot glue and Hot glue gun
Needle and Thread

Step 1: Cut out 1 circle of light brown felt 3/4" larger than the container lid.
Step 2: Cut out 1 circle of cotton fabric 1/2" larger than the container lid.
Step 3: Cut out 8 strips of light brown felt, 1/2" wide
Step 4: Cut out 2 circles of felt the size of the bottom of the container (use whatever color you like).
Step 5: Criss cross the felt strips over the cotton fabric circle.


Step7: Lay the cotton/strip piece on top of the light brown felt circle. Fold up the bottom piece, imitating the edge of a pie crust. Hand tack it to the top piece as you go. Leave about a 2" opening to stuff it.

Step 8: Stuff the pie. Then finish the hand-tacking
Step 9: Hot glue the smaller felt circles to the outside bottom of the container and the inside bottom of the container.


Step 10: Going slowly, hot glue the pie to the container lid - really work with it to pull the edges of the pie all the way down the sides of the lid so you won't see any ugly plastic lid.
Step 11: Cover the outside walls of the container in strips of ribbon or felt or some combination. I used ribbon first, then felt.
Labels:
felt,
gift idea,
yard or less
Friday, June 11, 2010
Aprons and cookies

This week we have made coordinating aprons for Charlotte, my mother-in-law, and myself.

Donning our new aprons we set out to make my mother-in-law's favorite cookies- Oatmeal Craisin.
So yummy (...and kind of healthy...they have oatmeal in them....does that count?).

This is a great cookie dough to make and have on hand because it freezes really well. I generated a recipe card for you to download or print with this cookie recipe on it -you can make your own recipe cards at this adorable site. This is the step-by-step...although I will admit the pics are more of Charlotte than cookie making......here we go :)
Step 1: Mix the sugar and shortening.

Step 2: Add the eggs.

Step 3: Sift the dry ingredients. (bonus sifting tip: Instead of using a sifter, use a whisk - it gets out all the lumps just as well)

Step 4: Mix in the vanilla.
Step 5: Add the coconut, craisins, and oatmeal and stir.

Step 6: Roll the dough into balls.

Step 7: Put some granulated sugar in a bowl. Wet the bottom of a glass, dip it into the sugar. Press the cookies flat with the sugared glass. It makes them nice and sparkly.

Step 8: Bake in the oven for 10-12 minutes.

Enjoy with a nice cold glass of milk!

Subscribe to:
Posts (Atom)
You may also enjoy...
