Showing posts with label kids crafts. Show all posts

Monday, June 10, 2013

{Educate} Sew By Number

Hey!  Well, I've been changing things up a bit around here.  A new look and a new sense of organization.  Now all of my posts will fit into one of four categories - which you can browse using the tabs beneath my header.  Decorate.  Create.  Educate.  Nourish.  

We have decided to homeschool in the fall - and so I'll be coming up with lots of crafts and projects for children.  You can find them under the Educate tab.  Today I wanted to share this super simple activity - which can easily be used for either gender.  
It also makes a great rainy summer day activity ;)
While we love lacing cards, with their sturdy frame and nice laces, we had a little difficulty grasping the concept of moving from one hole to the next.  So I decided to print out some pictures, punch holes around the edges, and number the holes.  Kind of like connect the dots with sewing.  
They have been a hit!  So here's how you can make your own!

Step 1:  Find a free printable coloring page through Google.  You can choose a character your child likes, or use something relevant to your unit in school. Print this picture onto card stock.

Step 2:  Cut around the picture - leaving a small border.  Punch holes around the border.

Step 3:  Number the holes.


Step 4:  Give your child some yarn and either a large darning needle or a piece of pipe cleaner folded in half and twisted to make a "needle".  I actually like the pipe cleaner option because you can make the eye as large or as small as you like, and your child can practice threading the needle.  Tape one end of the yarn to the back of the card.  Then start at number 1 and sew sew sew!  

Enjoy watching your child learn to sew!
xoxo
jessica

Monday, February 13, 2012

{DIY} Chocolate Hearts : Valentine's Day in Japan


Well in Japan, Valentine's Day is entirely the responsibility of the women.  
and they must give chocolate.
  
to every man they know.
 
(can you guess who invented this rule?)

The better the quality of chocolate, the more important you are to them.  
They give chocolate to coworkers, friends, boyfriend, dad, uncle, etc. etc.
  
but don't worry.  
 The Japanese women were not to be fooled.
They created another holiday, exactly a month later called White Day.
  
and this is the day the women get paid back.
  
supposedly the men who received chocolate from them must give them something  
3x the worth of the chocolate they received. 
hmmm...really makes you think about your chocolate purchase.
It was originally supposed to be a white gift such as cookies, jewelry, white lingerie, or marshmallows (? you'd have to be given some pretty awful chocolate if marshmallows are worth 3x...) 


If you have a special love of your life, the best way to show you love them is to make them a chocolate confection.  So Charlotte and I decided to do just that for Daddy.  It was really very easy and Charlotte had a fun time.  Here's what you'd need to make your own.  
You still have time, it takes about 15 minutes.

melting chocolates (easily found at Michaels in the States)
small candy tins
sugar decorations/sprinkles


Simply melt the chocolate in the microwave, 30 seconds at a time, until it's nice and smooth.  Use a spoon and spoon it into the tins.  Place the decorations on top, then put in the freezer to set until hard.  It might also be fun to experiment with something in the chocolate like peanut butter, dried fruit, marshmallows, or nuts.  Easy peasy and a great Valentine activity for those little hands.
Happy Valentine's Day!
(I can say that because it's already Tuesday here ;)
xoxo
jessica

p.s. don't forget to enter the giveaway!

Friday, July 29, 2011

*CTSB* Blow the Blues Away. . . with Blow Painting

 Hasn't this series been refreshing? I have been so inspired by all these crafty ladies. My crafty To-Do List has gotten larger but I am so excited. Here is my little contribution;

If you are like our family, this summer has been full of swimming, parties, fireworks, beach, vacations, road trips, crafts, and anything else fun we can squeeze into our Summer Holiday before school starts. Now, however we are winding down and the exciting adventures of summer are becoming dull and repetitive. We have been needing some new creative activities to occupy our time. Well, this twist on painting has occupied my girls for hours (literally, I had to beg them to come in for lunch) and perhaps this can blow some creative juices your way as well.

Blow Painting! This is so much fun! The girls and I wandered across this painting activity at the Lavender Festival. Seriously, that festival was so much fun and so motivating and inspiring. All you will need to do this activity is probably already in your home or easily acquired. It is for all ages, young and old, and is quite a forgiving art project. So here is what you will need:
water color paints (or acrylic paints well watered down)
paint brushes
straws of all diameters
water (a lot)
bowl for the water
mat board (tag board, card stock, or heavy paper)
We went outside to paint, but you can paint anywhere that is comfortable to you as long as it is protected from colored water.

Really wet your water color paint so that it drips well from your brush (the paint needs to be thin, so if you are using acrylic craft paint, just add a bit of paint in a bowl and add water to it). Drip some paint on to your mat board, then take a straw and closely blow the paint.
 See how the paint moves with the pressure of the air? You can change the direction of the paint but blowing beside the drop or on top of the drop. You could also use a dropper to drop thicker paint, but it is MUCH harder to blow the paint around.
Make sure you change your water often as the water will get muddy, and then in turn, muddy the paint colors.
 I like this activity because it allows the artist to enjoy the randomness of the paint and still control it to make a pretty picture. Just be careful not to get to wrapped up in the painting and blowing as you could become a bit lightheaded (ha ha, don't judge me, I had fun).

And of course when you are finished, you wash off with water. And if that turns into a run in the sprinkler, well, it just makes the summer day more enjoyable, right?

I hope this helps to blow some of your Summer Time Blues away. Enjoy the rest of your Summer Holiday,

Heaps of Love,
Shannon

Wednesday, July 27, 2011

*CTSB* - "Grass Babies" a kid's craft with Sunni from Love Affair with my Brother

Hi! I'm Sunni from Love Affair with my Brother. I was so excited when Jessica asked me to contribute to Cure the Summertime Blues. A little about me: I am a mommy of 2 little girls. I write a blog with my dear friend, Melissa. We chronicle our constant love and affection for our sewing machines by showcasing craft and sewing projects. Come by and see us!

It seems like the entire country is experiencing scorching heat, but here in the Pacific Northwest, we seem to be having an extended spring. Lots of rain and low temperatures (60's). So, unfortunately for my girls, we are still spending quite a few days indoors!!
So, I had to come up with a summery activity that anyone across the country could do. This is not my original idea. I have seen it elsewhere, but I am going to give you the details to make your own!! My daughter calls them "Grass Babies" I call it a "DIY Chia-head". Call it what you may, it is cute!!
And they are so cheap and simple to make.


You will need:
pantyhose (I used the freebies from the shoe department)
grass or wheatgrass seeds
soil
rubberbands
tray or jars to put them in
buttons, brads and foam decorations

I'm guess that you have most of this in your home or stash. The only thing I bought was the wheatgrass seeds. I used wheatgrass because stores don't sell tiny packets of lawn seed. So, if you are reseeding your lawn soon, just set aside a little of those seeds.

So, open up a pantyhose sock. I doubled up on a few, because these were so cheap and thin. 


Pour in some seeds.


Pour in some soil. I used a little from my vegetable garden.


Once you have a nice little ball, tie it off with a rubberband or knot.


Using a small rubber band, grab up a little mound and add a nose. I only went around the nose once, because the dirt will get pressed out if you fiddle with it too much.


Add some ears in the same manner. Your little Grass Baby is really coming together!! 


I used brads and buttons to add a face. I thought foam stickers or shapes would be fun to add, too, but we couldn't find any!!

When sewing on a button, I don't recommend using cotton thread. It might get moldy or mildew. Ewww. I used invisible nylon thread and looped it through a couple of times. Then I just tied it in the front with a knot. That should do it!!


Now just water your grass babies in a tray or place them in a jar with the tail sticking in the water. Water should wick up the pantyhose. I checked them every couple of days and added a little water, because I didn't trust the cheap pantyhose to wick it (wick it good).


The best thing about wheatgrass is that it sprouts so FAST! We had sprouts on day 2. As far as gardening goes, this is instant gratification. You can practically see it! It's as fun as watching grass grow!!


The wheatgrass is pretty to have in your kitchen or a windowsill. I sneak it my girls' morning smoothie because it is so nutritious. They will never know!


Thanks Sunni! I know Charlotte will love this!  Leave her some comment love everyone :)
xoxo
jessica

Monday, April 11, 2011

Tiny Treats

Do you have an abundance of plastic Easter Eggs?  
How about turn them into tiny bowls for tiny ice cream!  
I was inspired by these pom pom milkshakes - they are super cute.

Here's what you'll need:
plastic eggs
pom poms in different colors
ribbon/yarn
hot glue gun

Simply glue the pom poms into the bottom half of a plastic egg.  
Then decorate them with "chocolate syrup -yarn" and "cherries" and sprinkles.  
Lastly glue a small piece of ribbon around the top of the egg to make your bowl pretty.  
So cute right?

Perfect for ice cream socials with small friends.

Happy monday!
xo
jessica

Saturday, April 9, 2011

{DIY} Jellybean Bunting


This is a kid's craft, home decor, recycling project all rolled into one.  Doesn't get much better than that.  I was going to save this for Monday - but I thought you might be decorating your house some this weekend and I wanted to share.

So here's your Monday post, two days early.

Supplies:
3x5 index cards
old magazines
white glue
water
paint brushes
hot glue
string/ribbon

Step 1:  Tear up old magazine pages into little bits - and arrange them by color.  I used an old Anthropologie catalog and an old Country Living.  Now grab your kids (or your friends or your hubby) and sit down at the table.  Pour some glue into a paper bowl and dilute it with water.

Step 2:  Give everyone a 3x5 card and have them paint the glue mixture onto it - place the paper pieces on - then put some more glue on top of the pieces.  This is not hard, my two year old did it with ease and had a blast.  When you're done it should look something like this:

Let them dry for a while.  You may have to lay a book on top so they will dry flat.

Step 3:  Draw a bean template (also could be an egg) 1"wide x 2" long.  On the back of your index card, trace the bean shape - I was able to get about 4 beans per card.  Cut out the beans.

mmmmm... I feel more festive already. 


Step 4:  Heat up your glue gun.  Cut a very long piece of ribbon.  Sandwich the ribbon in between two beans and hot glue the beans together.  Move about 3" down the ribbon and repeat this process.  Continue until all the beans are on the ribbon.

Now hang them in a little spot that needs some spring cheer!
Mine was the finishing touch to my mantle:

Happy decorating!
xo
jessica

Wednesday, March 30, 2011

Kid's Craft / Mommy Craft: Hot Air Balloon Mobile


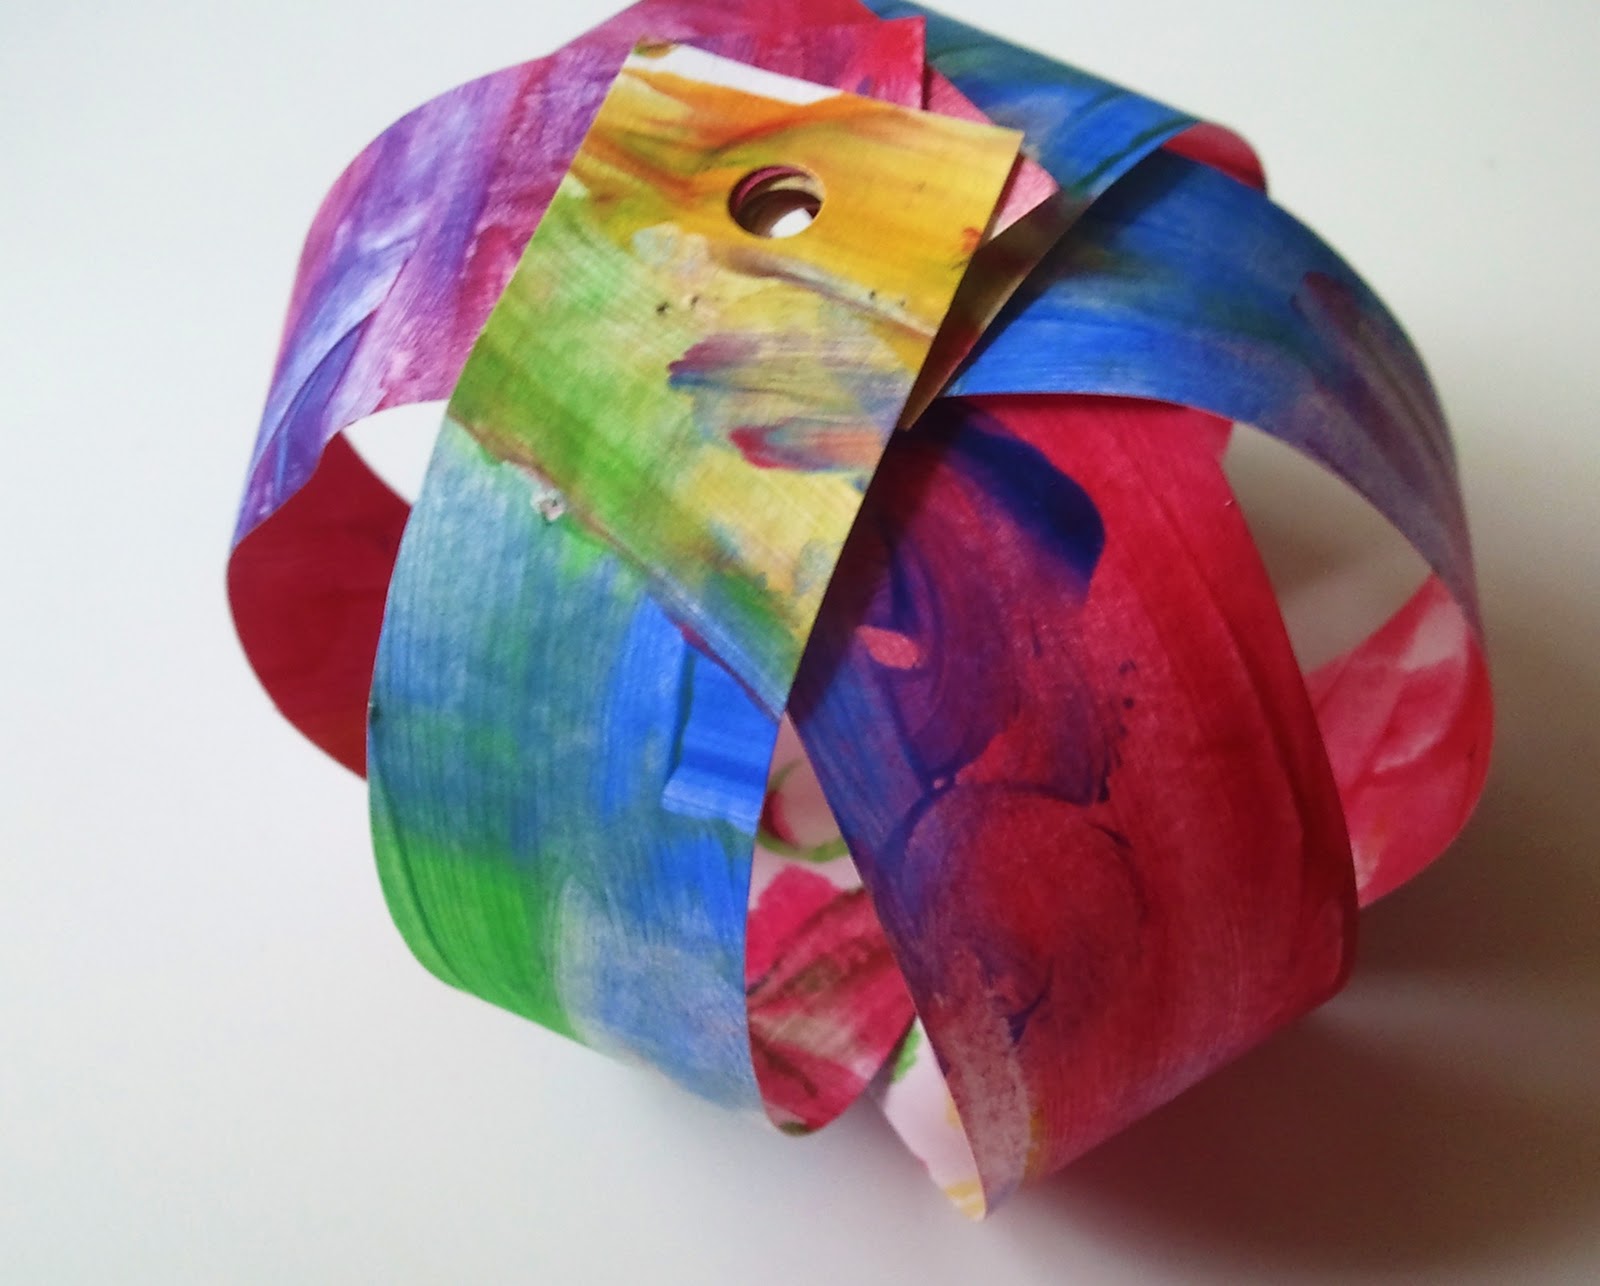
Sooooo this started out as a kid's craft, but the further along I got it really became a Mommy craft :)  Depending on the ages of your kids, they may or may not be able to help with the whole process.  On Mondays and Fridays I watch two other kids for a friend - one is a 3 year old girl - Charlotte's BFF, and one is a sweet little 3 month old boy.  So I've been trying to conjure up activities for us to do, especially on rainy days like we had on Monday.  Since the girls are 3 and 2 1/2 the only part they could really help with was the finger-painting.  But that was great fun. 
So here's how you and your kiddos can make your own hot air balloon mobile!

Supplies for one mobile:
2 pieces of white cardstock
1 piece of colored cardstock 
scissors
finger paint
yarn or string
2 long, thin dowels or skewers (I just cut the pointy ends off)
hole punch
stapler, tape.....glue possibly

Step 1:  Cut the pieces of cardstock in half, so you have four pieces 8.5" x 5.5" inches.  Finger paint both sides of all four pieces of paper.  Let them dry.

Step 2:  Cut the painted pieces of paper into 1" x 5.5" strips.  You will need 6 strips for 1 balloon.


Step 3:  Stack all 6 pieces and punch a hole through one end.  (you may have to do 3 at a time).
Step 4:  Lining up the holes, fan out the strips so they make a star shape.  Staple or tape them in the center - just don't cover the hole. 

Now bend them so that the other ends all meet - forming a sphere shape.  Tape/staple/glue/whatever to get those to stay in place.  ( I only have a tiny stapler, and it wasn't cooperating so I used tape.  If you have a large stapler I would suggest that.)

Step 5:  Make the "basket" by cutting a 1"x4" strip from your colored cardstock.  Roll it into a ring and tape in place.  Punch a hole in each side of the basket. 

Tie the string into a knot on one side of the basket.  Feed it through the balloon and tie it onto the other hole in the basket. 

Step 6:  Feed a piece string through the top hole you punched in the strips.  Use a small piece of tape to secure the string on the inside of the balloon.
Step 7:  Once you have made all the balloons you can begin to hang them on your dowels.  Cut one of the dowels in half so that you have 1 long one and 2 short ones.

{Optional step:  you can wrap the dowels in yarn - I thought it softened the look}

Hang one balloon from the center of the long dowel.  Hang a short dowel from each end of the long dowel.  From each end of the short dowels, hang one balloon.  On one of the short dowels hang the last balloon in the center. 

Enjoy!
xoxo
jessica

You may also enjoy...

Related Posts Plugin for WordPress, Blogger...