This is a fast project (hour or less) with impressive results!
Inspired by this shirt from Baby Gap:
Here's what you will need:
1 solid t-shirt or turtleneck (I got mine at Wal-mart for $2.00)
Scrap pink fabric
red thread (sulky preferred because it adds a little bit of shine)
batting scraps
sewing machine
Step 1: Cut out the bottom of the cupcake.
To make the cupcake liner shape, I measured 3" for the bottom and 4" for the top
- cut 2 pieces of pink, and 1 piece of batting.
sketch a few lines on one piece of the pink - to imitate the folds of a liner.
Step 2: Sandwich the batting in between the two pieces of pink.
Sew along the lines you drew like this:
When you're finished it will look like this:
Step 3: Pin it to the top layer of the shirt
topstitch around the perimeter of the cupcake - be sure to only sew through the top layer of the shirt!
Step 4: Now it's time to make the rosettes that comprise the cupcake icing. Find 5 strips of pink fabric (about 1 1/2" wide) - I used some light pink and some medium pink because that is what I had.
Step 5: You can make the rosettes anyway you like - hand sew them or machine sew them.
I chose to machine sew them
- it gives it a little different look, but I was feeling too lazy to get out the needle and thread :)
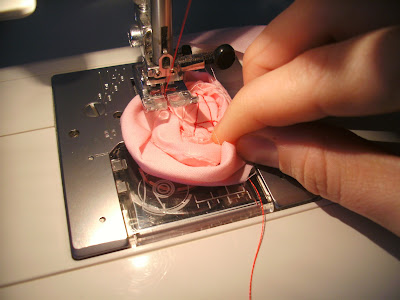
If you want to machine sew them, start a little spiral:
and sew back and forth across it - kind of in a little star pattern.
You will need to make 1 large rosette and 4 small ones.
Step 6: When you have made all 5, pin them onto the front of the shirt,
then top stitch them on - follow the lines created when you made the rosettes.
Step 7: Cut out 2 little hearts out of pink fabric, and 1 little heart out of batting.
Sandwich the batting in between the 2 hearts.
Pin it to the shirt:
Top stitch around the edge of the heart.
Put it on your little sweetie and give her a kiss!!
have a great weekend!
jessica


This is soooo cute!! I love it! What a great knockoff. :) Your model is such a cutie!
ReplyDeleteI LOVE THIS! It is awesome! :) I might have to try this soon! :)
ReplyDeleteOoooooo! I Love this! Great work!!!
ReplyDeleteI like yours better than the inspiration piece!
ReplyDeleteHi there, I just popped by from Twelve days until Christmas. I am a massage therapist in Canada and sew too! What great ideas you have on your blog, I will be back to visit!
ReplyDeletethis cupcake is so pretty!! If you ever have a chance I'd love for you to link up to Handmade Tuesdays @ Ladybug Blessings. www.ladybug-blessings.com oh & p.s come enter my giveaway for an inspirational dog print :)
ReplyDeleteI put a link to this tutorial on my blog for a more usefulness. thanks a lot
ReplyDeletehttp://les-envies-de-sarrouska.over-blog.com/