Thursday, May 20, 2010

Delicious summery cupcakes!


Tomorrow is my momma's birthday, so I am making some yummy Margarita Cupcakes to celebrate! I made these last year on her birthday and they turned out well, so we are making them again. You can find the recipe here, on Hostess with the Mostess. They are vegan (although I use butter and milk) and very easy to make (we also omit the tequila and they still taste lovely). Have fun! We're off to the beach today- can't wait for you to see the DIY tomorrow!
jessica

Wednesday, May 19, 2010

She sells seashells... - Free Pattern!


I am excited to say that I have my first free downloadable (is that a word?) pattern for you! Now, I know that this shirt is kind of girly...so if you have a boy, you could substitute the seashell for a cute crab or fish. Let's get started!

You will need:
A plain t-shirt that fits your little one: We bought this one at TJMaxx for $3 or $4.
A fun scrap of cotton fabric
A scrap of quilt batting
A fabric pen, or dressmaker's carbon paper
If doing the detailing by hand: embroidery floss, and embroidery needle
Or a machine that will do all of that for you :)
The free pattern

Print the pattern and cut out the seashell. Lay it on the cotton fabric and cut two seashells. Next cut one seashell out of the batting.

Make a little sandwich out of these pieces - fabric, batting, fabric. Pin them together. Trace the quilting design onto your fabric (the dotted lines on the pattern). Use your machine to "quilt" along these lines. You can use the regular stitch, just be sure all 3 layers are moving at the same time. Or, of course, you can hand quilt it. Some fun hand-quilting tips here.
Next, trace the words onto the shirt, using the carbon paper, or write your own using a fabric pen
Embroider the words.
Great embroidery tips here.


Place the seashell underneath the words. Use a blanket stitch, or a zig-zag stitch around the edge of the seashell to attach it to the t-shirt. Good job!

Now you have a fun new beachy t-shirt for your little one!

Monday, May 17, 2010

Summer Skin Care

Today we are going to discuss skincare strategies for summertime and beach-going. Your skin is your largest organ and it is SO important to take care of it - and to put quality products on it, not products that will clog your pores. Since your skin is the first thing a massage therapist treats, it is important for us to know the proper products to use.


Pre-beach:
  • Exfoliating Sugar Scrub
ingredients:
1 cup of sugar
3/4 cup of jojoba oil, safflower oil, or in a pinch...light extra virgin olive oil
15-25 drops of essential oil, depending on your sensitivity to smell
lavender, chamomile, or peppermint would be nice
(Do NOT use citrus oils when you will be going out in the sun. They are
phototoxic, meaning they will cause your
skin to burn. The oils are designed to attract the sun to the citrus fruit, while
it is on the tree, to help it grow.)
I use sugar as opposed to salt, because then you can shave your legs and the salt won't sting your legs. Massage into skin in a circular motion while in the shower. Use caution as the oil may make your shower slippery.
  • Sunscreen:
My choices for sunscreen include:
Kiss My Face Sunscreen
California Baby No-Fragrance Sunblock Stick
Alba Botanical Kids Mineral Sunblock


Post-beach:
  • Sunburn Soak
If you do happen to get a sunburn, this soak will help your skin heal overnight. Fill a bath tub with warm, not hot, water. Add 10-15 drops of Lavender essential oil(shocking right? ;). You can also add some oatmeal flour or use this oatmeal soak.
Lie in the tub and relax and let the lavender work it's magic.
  • Chamomile Tea Hair Rinse
Chamomile can condition hair and make the surface more shiny. Brew 1 tea bag for 10 minutes in very hot (just stopped boiling) water. Remove the tea bag and let it cool. When you are in the shower, pour it slowly over hair, starting at roots. Massage into scalp and hair and let sit for 5-10 minutes. Rinse as usual.
  • Skin Repair Breakfast
These ingredients contain vitamins and minerals necessary for the skin to repair damage.

Yogurt Smoothie:
1 cup of lowfat vanilla yogurt - contains vitamin A, aids in healthy skin
1 cup of frozen berries, such as blueberries, strawberries, or blackberries - contain antioxidants used to kill free radicals caused by sun damage
1 T. of flax seed - delivers essential fatty acids that help your skin produce good, moisturizing oils
(you may also sprinkle walnuts on the top of your smoothie once blended. They will do the same thing and are sometimes easier to find at the store.)

Blend all of these ingredients together and pour into a glass.
Pair with a toasted piece of whole wheat bread -contains selenium. Studies show that even skin damaged by the sun may suffer less consequences when high levels of selenium are present.

Enjoy your healthy glowing skin!
jessica

BEACH WEEK!!!! Adorable hooded towel DIY


Welcome to Beach Week on Sewhomegrown! Each day this week I will post something fun to make that pertains to beach going.
Today: Hooded Beach Towel

Over at Prudent Baby you can find the tutorial for this super-cute hooded towel. It doesn't take too long to make, and it is a great way to recycle some of your older bathroom towels that are fraying around the edges. This would also make an adorable gift for a summer birthday or for a baby shower. I didn't put piping all the way around like she did, I just put it around the hood and front edge. Charlotte looks so cute all snuggled up! We were talking this weekend about beach traditions that we have...and we realized that we really don't have any. We love going to the beach, but there isn't anything that we always do or take, so I wanted to ask you for ideas! What are your favorite beach/summer traditions? Do you have any yummy foods that you always make? Or perhaps a funny picture that everyone poses for? Let me know! Now, go find a yard of cute fabric and have fun making that towel!
Have a beachy day! jessica

Friday, May 14, 2010

Hi ho, hi ho, I cook, I clean, I sew...

Here's what I have done today...

Made homemade applesauce:
This is so easy and healthy for your family. Since you cook the apples with the skin on, you retain all of the nutrients in the whole apple. Charlotte would eat the whole batch by herself if I would let her. Here is what you will need:

1bag Macintosh apples
1/4-1/2 cup of organic raw sugar
1 tsp. cinnamon
Large pot
Ricer

Let the apples soak in cold water for a few minutes, then scrub the skin.
Chop the apples into quarters, not worrying about the core or seeds. Place them in a large pot. Put about an inch of water -no more, because the apples have a lot of water in them already. Cover the pot and cook the apples on low for about an hour.
Ladle about half of the cooked apples into the ricer - situated over a bowl. Work the cooked apples until all you are left with is a small amount of skin and seeds in the ricer. Empty that into the garbage and do the other half the same way. Once you have all of the applesauce in the bowl, add the sugar and cinnamon. Start with a 1/4cup of sugar and add the cinnamon. Taste it and then add more sugar/cinnamon to taste. Cover the bowl and refrigerate until you are ready to eat it. We like to eat it cold.

Cleaned our wedding rings:
In honor of my little sister's 1st wedding anniversary (which is tomorrow)- we cleaned our wedding rings. Super easy. Pour a small amount of plain ammonia into a small bowl. Drop your rings in and let them soak for a few minutes. Take a cleaning toothbrush and VERY gently brush the rings. Rinse off in cool water(plug the sink so they don't go down the drain). Your diamonds will sparkle like the day you were married! Happy Anniversary Joanna and Matt!
(photo taken by the talented Laura Hinely - laurahinelyphoto.wordpress.com)

Worked on my quilt:
My long term project is a queen sized quilt for our master bedroom. I am still in the piecing stage, but I am hoping to finish it while I am here at mom's. She has a quilting machine, and I am going to try my hand at machine quilting. I used 4 fabrics from Anna's Good Folks Collection, 1 fabric from Heather Bailey's Nicey Jane, and 1 fabric, that I can't remember the name of right now.
Busy day - busy weekend ahead, but filled with fun! Get ready for next week- it's beach week on sewhomegrown!! We'll be talking about skincare, yummy beachy foods, quick beach blanket, and more!! have a great weekend
jessica

Thursday, May 13, 2010

Hey Shortie


I have a fun summer shorts tutorial for you today! This can be modified to work for boys or girls (mommies of boys are you excited? this is for you :) All you will need is a pair of shorts that fits your little one well, wide elastic for the waistband, a half a yard of fabric, and 1/4" elastic for the bottom of the shorts - unless you are making it for a boy in which case I'm thinking no scrunchie hem. I will also note a disclaimer that this project is not super easy, but I have confidence in you! Do not be afraid! Look at the pictures and email me if you get stuck. You can do it.

Find a pair of shorts to use for your pattern.
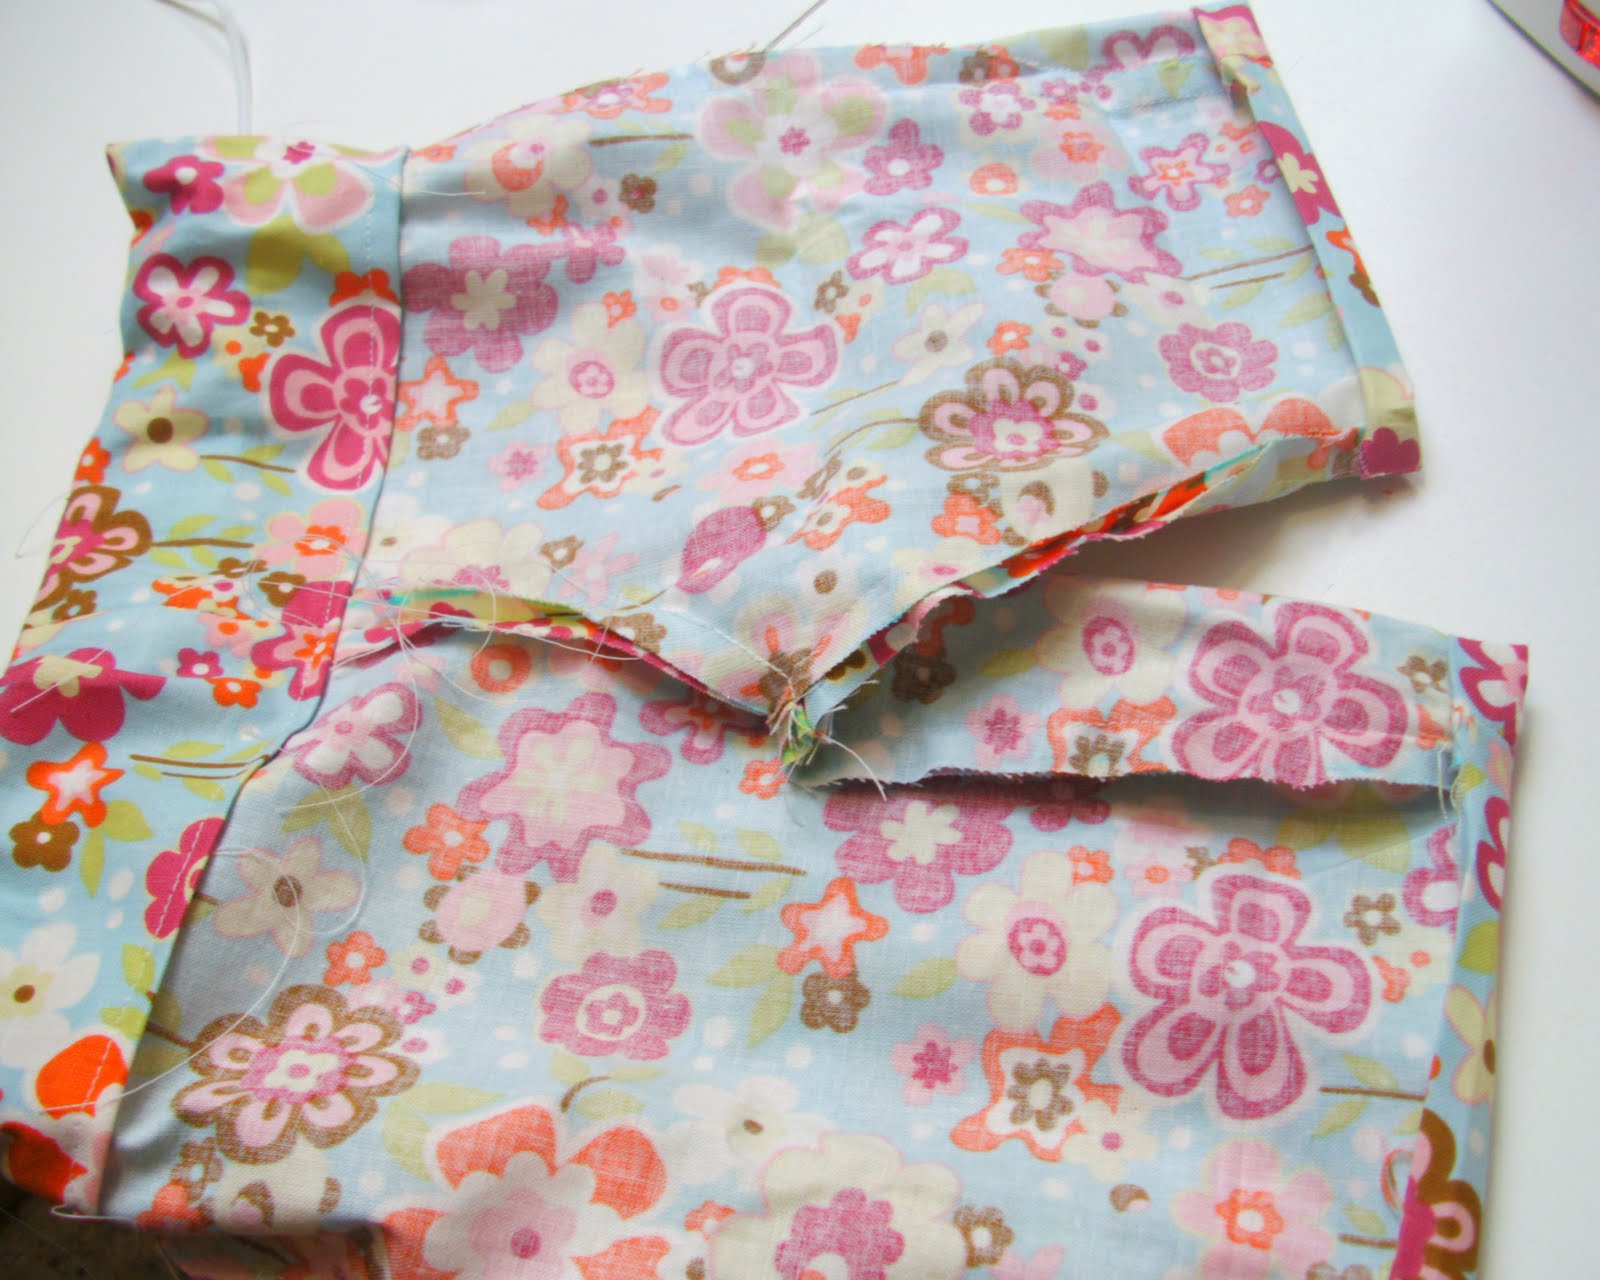
Turn them inside out, and reach through one leg to pull the other leg inside it.
It should now look like this:
This piece that you can see is one of the back panels that make up these shorts - they are made up of 4 pieces, two identical back pieces, and two identical front pieces. Fold your fabric wrong sides together so that you are cutting two layers at a time. This way you can cut both back pieces at the same time. Lay the shorts, still folded, onto your fabric. Trace around the sides, 1/2' larger from the shorts. Along the top add 3", and along the bottom, add 2" -This will allow for waistband and hem. Cut along your line.
Watch out for the curve around the crotch - it folded under and I had to measure how much it folded under and continue the curve out on my own. As shown below. (My sister is always accusing me of making things up and expecting her to know exactly what I am talking about...are you agreeing with her yet?)

Okay, those are your two back panels. Now, unfold the shorts and pull one leg inside the other so that one front panel of your shorts is showing. You will use this as your pattern for the two front panels. Repeat your process - lay the shorts on the fabric, draw around(3" from the top, 1/2" from the side and 2" from the hem).

Four panels to make up your shorts:
The back panels should have a bigger curve for the center seam(the crotch) than the front panels. This gives room for your baby's bottom to wiggle.

Before you sew it all together now is the time to finish your raw edges. On each piece (ALL 4 ) Zig-zag or serge the side edges, the inseam edge and the crotch edge.

Sew the two back panels, right sides together, along the center seam. Repeat with the two front panels.


Now pin the front to the back, right sides together along the side seams, and the inseam.

Sew the side seams, and then sew the inseam -using a 1/2" seam. Turn right sides out.
Now we are going to do the waistband. Fold the top 1/4" down and press.

Next, fold it over about two inches.

Now, this is important, measure from the crotch to the top of the waistband on the pattern shorts. Charlotte's measured 6". Make sure that the measurement from the crotch to the top of the waistband on this pair is the same.

Stitch around the bottom of the waistband. Leave about an inch opening.
Measure your little one's waist and add 1 1/2 ". Cut the piece of waistband elastic this length.
Pin a safety pin to the elastic. Insert it into the waistband and feed it through. Be careful not to twist it.Once you have made it all the way around, stitch the two ends of the elastic together. Tuck it inside the waistband and close.

To make the scrunchie hem, repeat this process along the hem, only folding it up 1/4" inch, then a 1/2". To make a regular hem, try the shorts on your little one, and measure the hem. Fold it up a 1/4" and then fold it up again to make it the correct length. Top stitch it into place.

Embellishments:
To quote my mother, the great seamstress, "The details make it look handmade, not homemade." The buttons, bows, trims add so much character to your clothing. I added an extra stitch around the top of the waistband to give it a nice crisp shape.

Then I sewed on two buttons to the waistband and two buttons on the side of each leg at the hem.
Then we got dressed and played outside in our breezy new shorts!


Tuesday, May 11, 2010

French Press Cozy Tutorial


This Mother's Day I made my momma a French Press Cozy. If you don't know, French Press is the most pure way to make coffee. You boil the water and pour it over the grounds in the press. Then you let it steep for 4 minutes, and then press the grounds to the bottom of the pot. The only problem is that it does not stay hot very long. Mom is always wrapping a dish towel around hers to keep it warm. So...I made this French Press cozy- taking the idea of a tea pot cozy and stretching it to fit this size pot. Here is the tutorial for you to make your own!

Step 1:
(These measurements are for a 4 cup french press-if yours is larger or smaller, simply measure the height and circumference(including the handle) of your press).

Cut out six rectangles. Two for the outer fabric - 9 1/2" x 11". Two for the lining fabric - 9 1/2"x 13". Two for the insulation fabric - I used terry cloth(which would be a great repurpose for an old towel), but you could also use batting. The insulation should be 9 1/2" x 12".

Step 2:
Now is the time to do any embroidery or decoration that you would like on the outside of the fabric. I embroidered the word, "Energize". If you are insecure about your handwriting, you can go here and find some great free fonts - print out the word you want to use and trace it onto the fabric.

Step3:
Stitch the outer fabric to the lining fabric, right sides together, along the bottom edge.

Step4:
Press the lining so that an inch of it shows below the outer fabric- to create the band at the bottom of the cozy. The top edge of the lining and outer fabric should now be aligned.

Step 5:
Insert the insulation material between the lining and outer fabric. Pin it well.

Step 6:
Pin the front and back pieces together along one side, right sides together. Wrap it around your press, and pin it to fit the shape of the press. You will create a dome shape with the pins. When you are satisfied with the shape, slip it off the press and lay it flat. Trim 1/2" larger than where your pins are. This will allow for a 1/2" seam.

Step 7:
In order to keep the insulation material from sliding, I hand-quilted the front piece, and tacked the back piece (because I was getting lazy...). You may choose any quilting pattern you like - I followed the diamond pattern that was in my fabric (which comes from Anna Maria's Good Folks collection).

Step 8:
You're almost done! Put front and back pieces right sides together. Stitch together, using a 1/2" seam. Turn it right sides out.

Step 9: I ran some thin ribbon through a needle and created the loop on the top of the cozy. You could also make a loop out of your fabric, and stitch it in when you stitch the seam.

Now make a lovely pot of coffee, get a cookie or two. Sit back, relax, and admire your work. Well done!

You may also enjoy...

Related Posts Plugin for WordPress, Blogger...