Thursday, October 6, 2011

To Tear or Not To Tear...

...that is the question. 
 buy these gorg fabrics here

Have you ever purchased fabric and been surprised (or alarmed) when they tore the fabric instead of used scissors to cut it?  There's a bit of a debate about whether it is better to cut yardage or tear it...but here are my views after speaking with several different sources. 
The first question you might have is why would you tear it in the first place? 
When you tear a fabric (usually done with cotton) it will tear perfectly straight along the weave of the fabric.  The weave may or may not be perfectly straight with the pattern on the fabric. 

So it depends on what you are sewing.

When you are sewing clothing, it is really more important for the fabric to hang straight than for the pattern to be straight.
If you are using fabric for crafting or quilting it is not as important for the weave to be straight - it's really more important for the pattern on the fabric to be square.

So if you are buying yardage to make clothing, be sure that you tear both cut edges from selvage to selvage (if they didn't do it at the store).  This will give you a perfectly straight piece of fabric no matter how the pattern on the fabric may appear.

If you are making something else - like a pillow - you can cut both non selvage edges so that the pattern looks straight.

**If you are totally confused by what I mean by tearing the fabric, this is how you do it.  Make a small snip in the selvage with scissors (about 1" from the cut edge) and then tear it all the way to the other selvage then snip the other selvage.**

Now you may be thinking - okay...I want my pants to hang nicely, but I don't want the pattern to be wonky either...

Sometimes you can do it half way.  Tear the fabric so you know it's straight, then even the pattern up a little so it's not too off.  Is that confusing?  I hope not. 
Oh and once you get the fabric straight you should use scissors to cut out your pattern pieces.  (Just didn't want you to think you have to tear the fabric the whole time ;)

Happy fabric shopping!
xoxo
jessica

Wednesday, October 5, 2011

{DIY} Love You to Pieces Skirt


Hey!  I'm excited to share this tutorial with you.  
This is another great way to use up scraps.  

My mom had made a quilt using Anna Maria Horner's new line Loulouthi -
and she had some wonderful scraps leftover.
We found this skirt as inspiration on Pinterest 

(how adorable is that?) 
and decided to make our own!  
Here are the supplies you'll need (I made a size 3T):
scraps of fabric that equal around 1 - 1 1/2 yards
24" of 3/4" elastic
scissors/pins/iron/thread/sewing machine

Step 1:
Cut the pieces.
You will need a Yoke Waistband, Skirt Fabric, and Contrast Band Hem.


Okay I know that's kind of a crazy picture.
I pieced a bunch of things because I was working with smaller scraps, but here are the dimensions explained:
Yoke: 5"x 23" (mine were in two pieces 5"x 12" and I had to sew them together)
Skirt: 8 1/2"x 46" when sewn together.  You will need to add an inch for every piece to allow for the seam allowance - when I laid these all out after cutting it measured 53", but after sewing them it measured 46".
Contrast Band: 3" x 46" when stitched together.  The same applies here - you may have to piece a few strips, but once you sew it together it should measure 3" x 46".

Step 2:
Sew all the skirt pieces together.  You should have a long piece that measures  8 1/2" x 46".
Serge or zig zag all of the seams.
 Step 3: 
Sew the Contrast Band strips together (right sides together) so that you have on long band 3" x 46".
  Lay it's right side against the wrong side of the skirt panel and pin. 
(This may seem wrong, but go with me here)
 Sew along the edge using 3/8" seam.
When you have finished, open it up and it will look like this:

Step 4:
Press 1/4" of the band toward the wrong side.
  

Then press the band up about 1" and pin it to the skirt panel.


Top stitch it in place.
Here's how it should look: front and back.

Step 5:
Using a basting stitch, sew along the top of the skirt panel twice and gather so that it measures 23".

Step 6:
Pin the yoke waistband right sides together along the gathered edge.

Stitch in place.
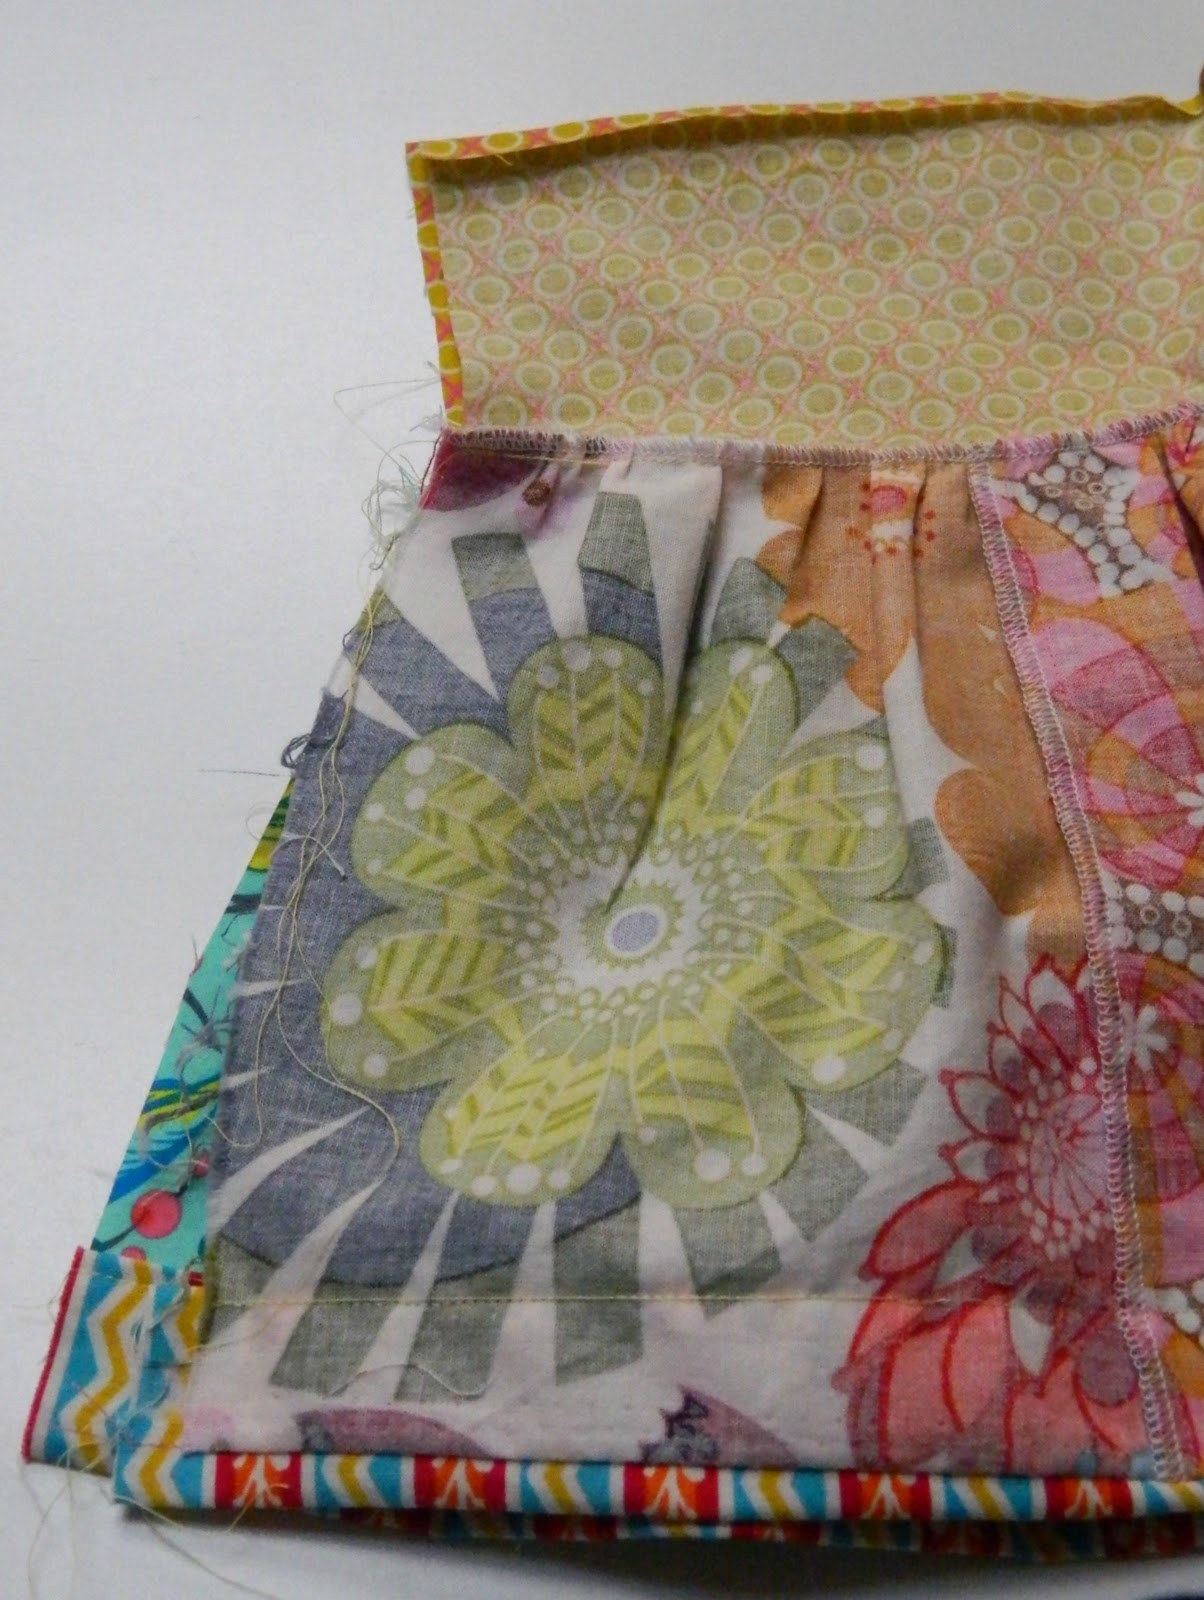
Zig zag or serge the seam then press it towards the skirt.
It should now look like this:

Step 7:
Press the top of the waistband under 1/4", then pin the edges of the skirt right sides together
and sew the side seam.
 Zig zag or serge the side seam.  

Step 8:
Fold the top of the yoke down about 1 1/2".  

Leave about a one inch opening, and stitch it in place.

Step 9:
Fasten a safety pin to one end of the elastic and run it through the casing.

Measure it on your kiddo to get the right size, then stitch the two elastic ends together.

Slip the elastic inside and topstitch the opening closed.

Step 10: 
This step is optional but it makes the garment look a little more professional and it will keep the elastic from rolling when you wash it.  Scoot the elastic to the bottom of the casing, and top stitch around the top of the yoke, about 1/8" down from the top.

When you are finished, it will look like this:


That's it! Enjoy watching your cutie spin and play in her new skirt!


happy sewing,
xoxo
jessica

Wednesday, September 28, 2011

Macaroni and Cheese...my weakness

So I have a weakness for any combination of pasta and cheese.  

I hesitate to even write this post because I'm reading this book called Wheat Belly: Lose the Wheat, Lose the Weight and find Your Way Back To Health.  It's really good and I recommend it, but it is definitely NOT in favor of consuming wheat.  So let's pretend that I made this with Gluten-Free Pasta, which you could totally do and it would be just as delicious, because the secret's in the cheese.
(On a Gluten Free Pasta note you have got to try Heartland G-Free Pasta -  best I've found.  You can't even tell the difference.  I can only find it at Wal-Mart.)
This recipe isn't new - it was on Martha Stewart a few years ago, but I just rediscovered it, made it last night, and it is soooooo good.  
It's the recipe from Beecher's Cheese.  You can order the mac and cheese frozen from their website, but it costs $50...and it cost about $15 to make - still a little pricey for mac and cheese so you might want to make it a special occasion dish.
I was able to find the Beecher's Flagship Cheese (it's a cheddar) at Publix, so I bought a few ounces of that and then supplemented with Publix cheddar and Publix Jack.  Then I used Boar's Head Gruyere on top.  I served it alongside a chicken greek salad - hopefully offsetting the cheesy creaminess with some veggies and fiber :)


Oh and the Flagship sauce recipe is enough for a double batch of pasta - 12 oz.  Which of course is what I made.... and I'll also confess I ate way more than that cute little portion in that picture:)
xoxo
jessica

Tuesday, September 27, 2011

Over on Prudent Baby: Rayon Sewing 101

Hey!  Yesterday I posted some tips for sewing with rayon over on Prudent Baby. 

In case you missed it, here's the link:
Sewing with Rayon 101
They also posted some links for great tutorials that would be great using rayon. 
xoxo
jessica

Monday, September 26, 2011

Inspiration Board: Charlotte's Three Year Old Room

In one attempt to distract myself from the craziness that is my life...I've started planning Charlotte's room for our home in Japan.  I want to be able to make everything now (curtains, pillows, quilt), so that when we get there, her room can be a happy cozy place in a short amount of time.  Plus it gives me something to do now :)  So here's my inspiration.  That fabric is Valori Wells Wrenly - it's so happy and I think it will transition well from 3 - 6 yrs old which will be her ages while we are in Japan.


The plan for the bed is from here.  Ryan is going to get it all cut out, and then we'll ship it Ikea-style and assemble it when we get there.  We already have that green chair, and I think a pillow out of that bird fabric will look adorable on it.  I bought a rug at Old Time Pottery for $50 that looks very similar to the one shown here.  It's very cheery and I like all the squares of color.  That lamp shade is from here.  I think I have to have it.  So there it is - what do you think?  Any suggestions?  I haven't done pink in her room yet so I kinda wanted the girly look. 
Hope you had a great weekend!
xoxo
jessica


Friday, September 23, 2011

Delectable Apple Crisp

Last night I made this apple crisp

- it's kind of a mish mash of several recipes, but it turned out great so I wrote down what I did and decided to share (yeah the pic is not great because I had already started eating it then ran into the kitchen to snap a pic before I gobbled it all up).  In my opinion here are the secrets: fresh vanilla bean, salt, pecans.  Those three things combined with the usual apple crisp ingredients make a rich, flavorful dessert.  AND bonus - it's wheat free (not necessarily gluten free because of the debate over oats and cross contamination, but oats in and of themselves don't contain gluten.  I think. ) 
Anyway here's the recipe!
Serves 4:
3 large apples peeled, cored, and sliced thinly
1 T. granulated sugar
3/4 cup of pecans
1 vanilla bean
3/4 cup of quick oats
1/2 cup of packed brown sugar
1 tsp cinnamon
5 T butter
1/2 tsp salt


Preheat oven to 350.  Lay the apples in a tart plate or pie plate.  Sprinkle the granulated sugar over the apple slices.  In a medium bowl place the pecans, oats, brown sugar, and cinnnamon.  Slice a vanilla bean in half and scrape out the seeds - add it to the dry ingredients.  Cut the butter in - then with a sharp chopper, chop all the ingredients together until it looks all pretty and crumbly.  Pour this mixture over the apple slices.  Lastly sprinkle the salt evenly on top and bake for 20 - 30 minutes.  Don't over bake.  Since the apples are sliced thinly they should take that long to bake.  Remove from the oven and let cool slightly then serve it up with ice cream!  Yum!  Have a great weekend!
xoxo
jessica

Wednesday, September 21, 2011

{DIY} Anthropologie-inspired Headband

Okay, sincerest apologies for flaking out on you for the last week.  I didn't really mean for that to happen, but I was in the process of getting our family completely out of TN and down to FL.  We will be here for the next 2 months before we move to Japan.  BUT I did manage to whip up this little headband last night and I wanted to share it with you. 
 I haven't done anything Anthropologie in a while
- and I was craving something in their style. 
Here's Mine:

Here's Anthros:

I made mine out of cotton, but theirs is made using a rayon fabric and I think it would be great to make another one using that. 
Here's what you'll need:
1/2 yard of cotton or rayon
(I used Anna Maria Horner's LouLouThi)
iron/pins
scissors/thread/sewing machine
a 6" piece of 3/4" elastic

Step 1:  Cut 1 strip (the one you want to make the knot in) 6"x26".
Cut another strip 6"x22".
Step 2:  Fold each strip in half, length-wise and sew right sides together along the long edge.

Open that seam and press it flat.
(I changed fabrics half way through...sorry for the confusion)

Step 2:  Turn that tube right sides out and repeat with the other strip of fabric.

Now you should have 2 strips, one 4" longer than the other.

Step 3:  Tie a knot in the middle of the longer strip.  Pin it on top of the shorter strip.


I kind of pinned it so it would look like it was flowing, rather than just flat.

Step 4:  Sew this piece onto the bottom piece - you just need a few little stitches to keep it in place.  Turn the raw edges under and sew them down.
Also secure the knot with a few stitches.

Step 5: Cut a 5" square.

Sew it into a tube like you did with the strips at the beginning.  Turn it right sides out.

Step 6:  Slide the elastic inside this tube.  Then put the elastic and little tube inside the larger - tucking in the raw edges of the larger.  Stitch across.
Step 7:  Now try it on your head, and pull the elastic until it meets the other end of the headband and feels comfortable on your head.  Keep your finger where the stretched elastic and free end of the headband meet.  Take it off your head and put a mark on the elastic where your finger is.  Scrunch up the little tube until the raw end matches up with the mark on the elastic.  Slide the elastic and little tube into the open end of the headband and sew across.

Enjoy your new headband!
happy wednesday
xoxo
jessica
You may also enjoy...

Related Posts Plugin for WordPress, Blogger...